Original Link: https://www.anandtech.com/show/9391/the-asrock-x99e-itx-ac-review-36-threads
The ASRock X99E-ITX/ac Review: Up to 36 Threads in Mini-ITX
by Ian Cutress on June 24, 2015 8:00 AM EST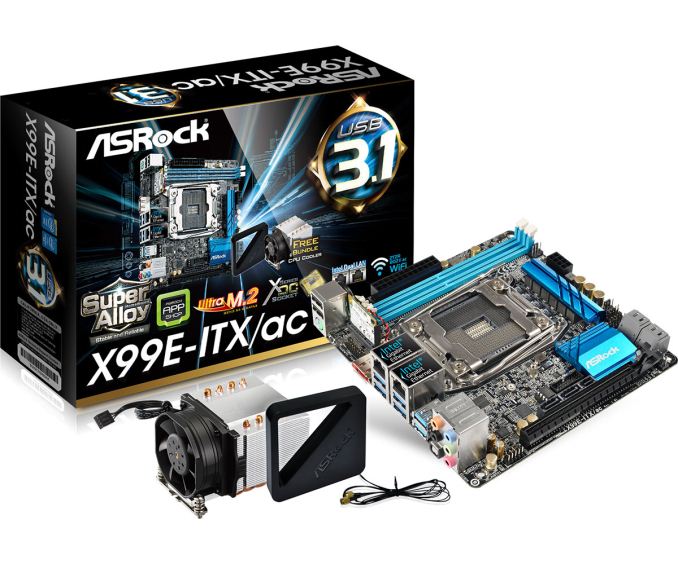
// For readers expecting the AMD Fury X review, unfortunately Ryan has been battling a virus this week and despite his best efforts it has taken its toll. The review is near completion but with a couple of key elements still to do - please keep your eyes peeled over the next few days for the full analysis.
When things get smaller, compromises have to be made. We've seen this recently in our Core-M deep dive where building a cheaper chassis yields few benefits. In the PC space, the mini-ITX form factor has held a level of fascination for small builds, so it was only a matter of time before someone built an ITX motherboard for the most extreme platform. Some compromises were made, but ASRock delivered and we were sent the X99E-ITX/ac for review.
ASRock X99E-ITX/ac Overview
Intel's high end platforms offer two distinct benefits over the more mainstream counterparts. Firstly is performance, especially in multithreaded scenarios where we can use up to 8 cores with consumer processors or 18 cores with Xeons – double the threads with hyperthreading as well. The second element is connectivity, in the form of PCIe lanes where Haswell-E can offer up to 40. X99 yields other benefits as well from the chipset itself, so when a mini-ITX platform for the high end was made, a balancing act is made by virtue of the lack of space on the PCB. We've seen this mitigated before with ITX products like the Z97 Impact that use daughter boards, but the upshot of the X99E-ITX is that the connectivity element of the equation, that which is available to the user, is lower than normal for an X99 product.
This means that for GPUs on the X99E-ITX, only 16 of the 40 PCIe 3.0 lanes that the processor can provide are used (similarly, only 16 of the 28 lanes on the i7-5820K). Due to space onboard, only two memory channels are used for two slots of DDR4. The SATA connections from the chipset are also reduced from 10 to 6. It is also worth mentioning that the socket size is not the standard ILM measurements for LGA2011-3 - the narrow ILM standard, more commonly seen in servers, is used instead. ASRock gets around this final issue by sourcing and including an appropriate cooler from Dynatron (a well-known CPU cooler manufacturer in the server space) which is in the package when you buy the motherboard. There is also an included water cooling bracket which covers the brands that use a magnetic latch system.
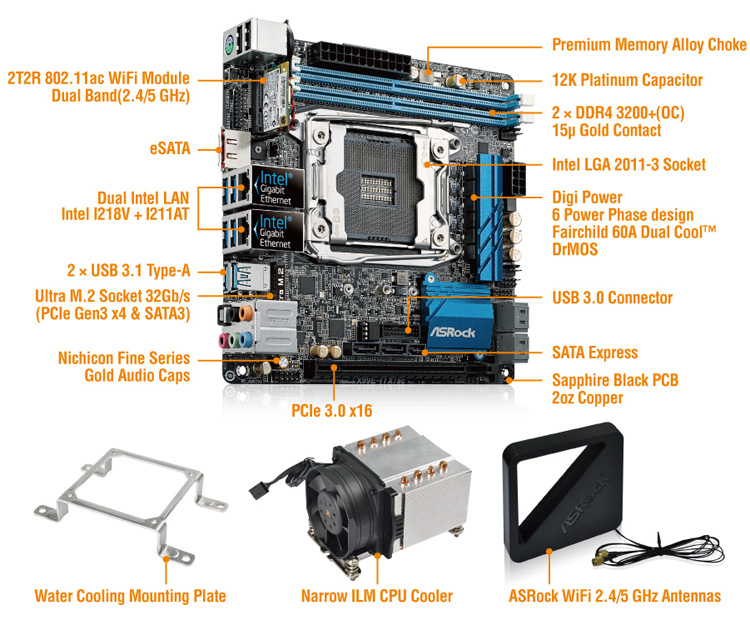
On the plus side for storage we get a SATA Express port as well as an M.2 PCIe 3.0 x4 which uses some of the spare CPU PCIe lanes. The board is also equipped with dual Intel network ports and dual band 2T2R 802.11ac WiFi to enhance network connections, and to top it off is a pair of USB 3.1 Type-A ports provided by an ASMedia controller using two PCH lanes.
Ultimately a lot of users are going to judge this product by virtue of what it doesn't have. For some the high end platform means high end gaming, or fast memory throughput by not limiting the potential. But that isn't the goal here. High density CPU based compute systems, especially for those that can run headless and networked systems, pride themselves on this sort of size. The X99E-ITX fits that niche, and its success (or failure) will be closely monitored by the other motherboard manufacturers.
A big part of the review today will be testing just how much limiting the memory to dual channel hurts Haswell-E, and ultimately if this is cause for concern.
Visual Inspection
The mini-ITX standard measures 17cm x 17cm, and it would seem that almost every millimeter of this motherboard is filled in. Consumers migrating from older platforms will at first notice the narrow ILM socket, which is right up against the DRAM slots to the top and the M.2 slot at the bottom. If you’re familiar with X99 but not with narrow ILM, take a look at the top latch of the socket, and it is worth seeing the difference in the latch arm – we get a front flat end, rather than the typical hook.
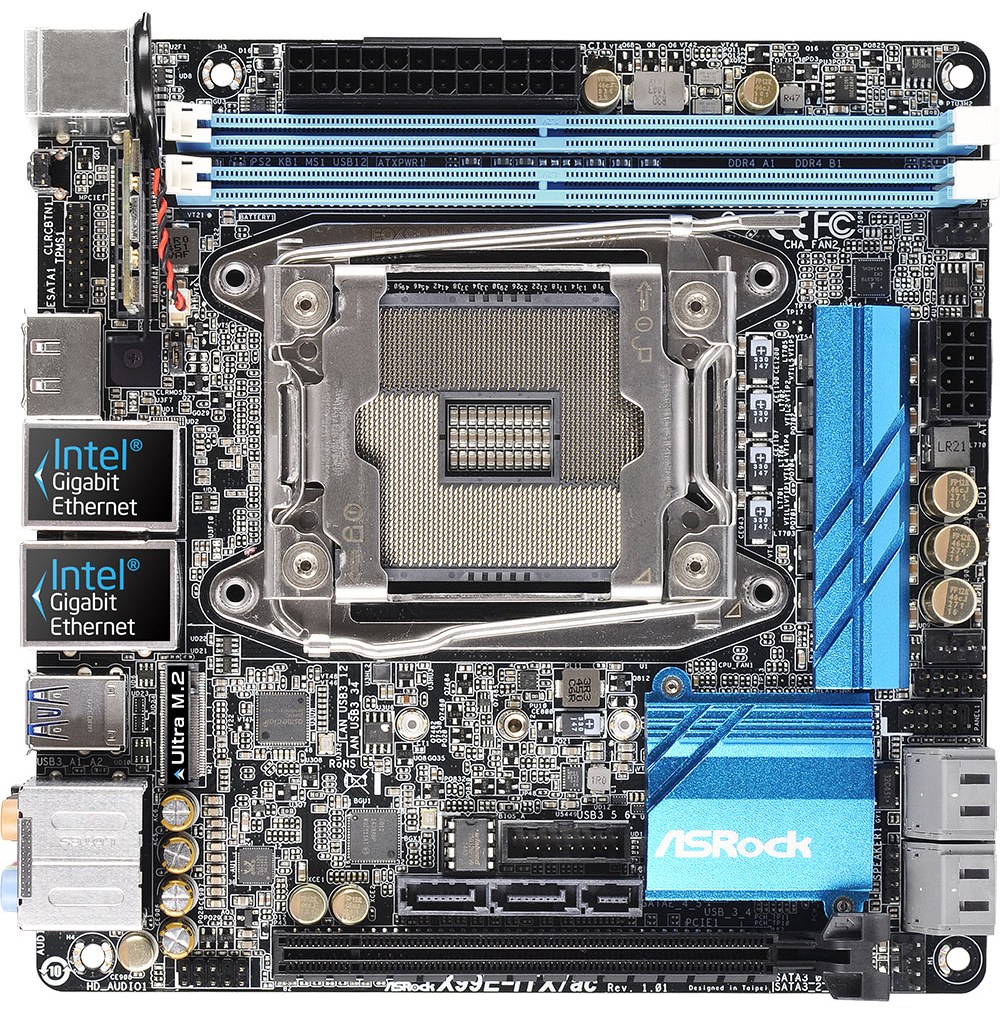
The socket has access to two fan headers on the right hand side of the motherboard – one just below the DRAM slots and another above the SATA ports on the right hand side. There is a third below the SATA ports, although it might be worth investing in a right angled connector if a large GPU is in place. Between the fan headers and the socket is our power delivery, which features a six-phase design using Cooper-Bussmann chokes, similar to a number of server platforms.
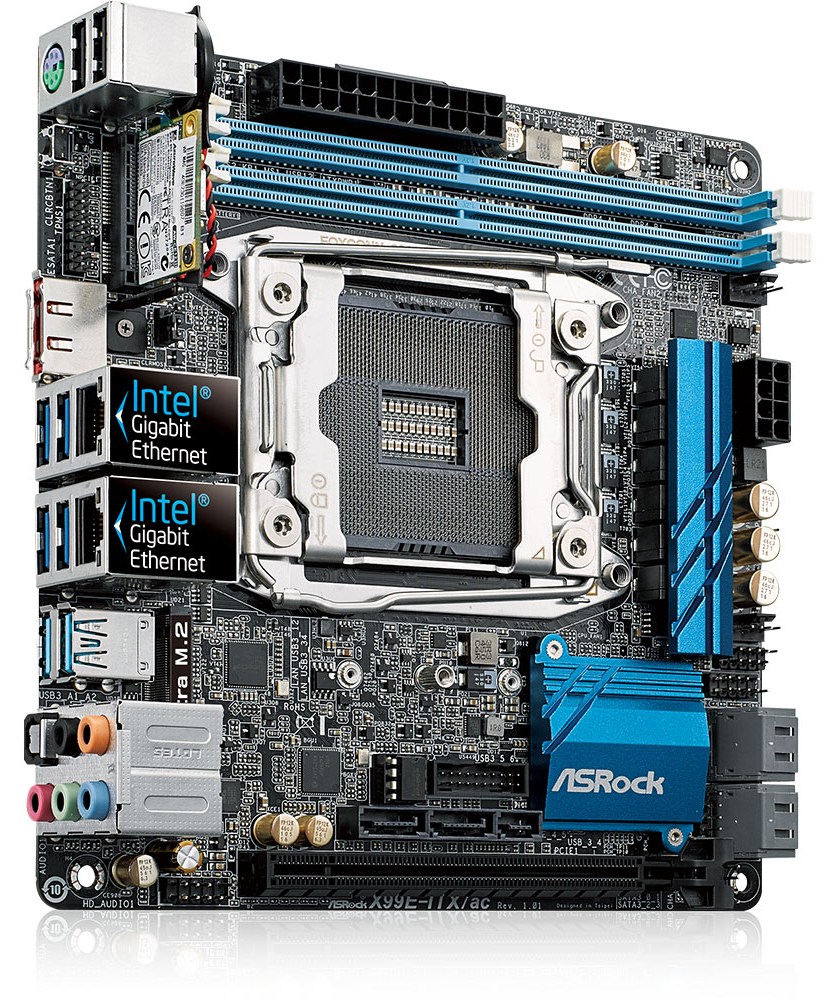
The two DRAM slots stick out like a sore thumb, and in order to accommodate everything both the socket and the DRAM are at right angles compared to the normal arrangement we see on consumer products. Even with this arrangement ASRock was able to implement one of my pertinent requirements for a good ITX build – having the power connections around the edge of the motherboard. At the top is the 24-pin ATX power, and to the right is the 8-pin EPS 12V.
On the right hand side along with our power delivery and fan headers is the front panel header, a USB 2.0 header and four of our SATA ports. There are two more on the motherboard which are both bundled as part of a SATA Express port just above the PCIe slot in the middle. Given the prevalence at which SATAe has not entered the market, I am glad that an M.2 PCIe 3.0 x4 slot is included as well between the CPU and the PCIe slot. This makes up for some of the CPU lanes not being used.
The audio header is located in the bottom left of the motherboard, which might cause issues depending on what sort of graphics card is used, but the audio is powered by a Realtek ALC1150 for good measure. At the top of the board is our WiFi card, using a mini-PCIe slot just behind the rear panel IO and complimenting the dual Intel network ports on the rear panel.
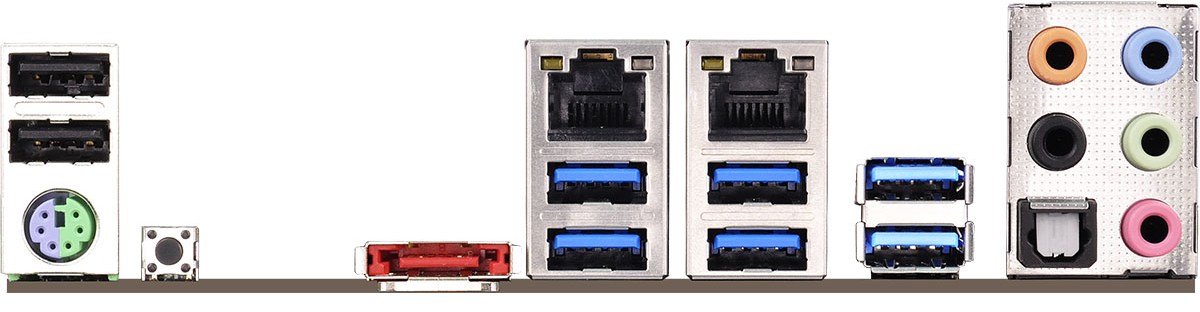
The rear panel has two USB 2.0 ports, a combination PS/2 port, a reset CMOS button, an eSATA port, four USB 3.0 ports from the chipset, and the two aforementioned Intel network ports (I218-V and I211-AT). Another premium feature on this motherboard is the USB 3.1 connectivity where we get two Type-A ports due to the onboard ASMedia controller.
Board Features
| ASRock X99E-ITX/ac | |
| Price | US |
| Size | Mini-ITX |
| CPU Interface | LGA2011-3 |
| Chipset | Intel X99 |
| Memory Slots | Two DDR4 DIMM slots supporting up to 32 GB (2x16) UDIMM Up to Dual Channel, 1600-3200 MHz |
| Video Outputs | None |
| Network Connectivity | Intel I218-V Intel I211-AT 802.11ac 2T2R Dual Band WiFi |
| Onboard Audio | Realtek ALC1150 |
| Expansion Slots | 1 x PCIe 3.0 x16 1 x mini-PCIe |
| Onboard Storage | 6 x SATA 6 Gbps, RAID 0/1/5/10 1 x SATA Express 1 x M.2 PCIe 3.0 x4 (2260 / 2280 / 22110) / M.2 SATA |
| USB 3.0 / USB 3.1 | 4 x USB 3.0 Rear Ports 1 x USB 3.0 Header 2 x USB 3.1 Type-A (ASMedia) |
| Onboard | 6 x SATA 6 Gbps 1 x SATA Express 1 x M.2 3 x Fan Headers 1 x USB 3.0 Header 1 x USB 2.0 Header 1 x Front Panel Header 1 x Audio Header 1 x TPM Header |
| Power Connectors | 1 x 24-pin ATX 1 x 8-pin CPU |
| Fan Headers | 1 x CPU (4-pin) 2 x SYS (4-pin) |
| IO Panel | 2 x USB 2.0 1 x Combination PS/2 1 x ClearCMOS Button 2 x WiFi Antenna 1 x eSATA 4 x USB 3.0 1 x Intel I218-V 1 x Intel I211-AT 2 x USB 3.1 Audio Jacks |
| Warranty Period | 3 Years |
| Product Page | Link |
Much of the detail of the ASRock X99 BIOS is similar to that in our previous ASRock X99 motherboard reviews (Extreme11, OC Formula, X99-E/WS 10G, Extreme6). As a result we have copied the description and included it here for clarity, updated for the X99E-ITX/ac specific options.
ASRock X99E-ITX/ac BIOS
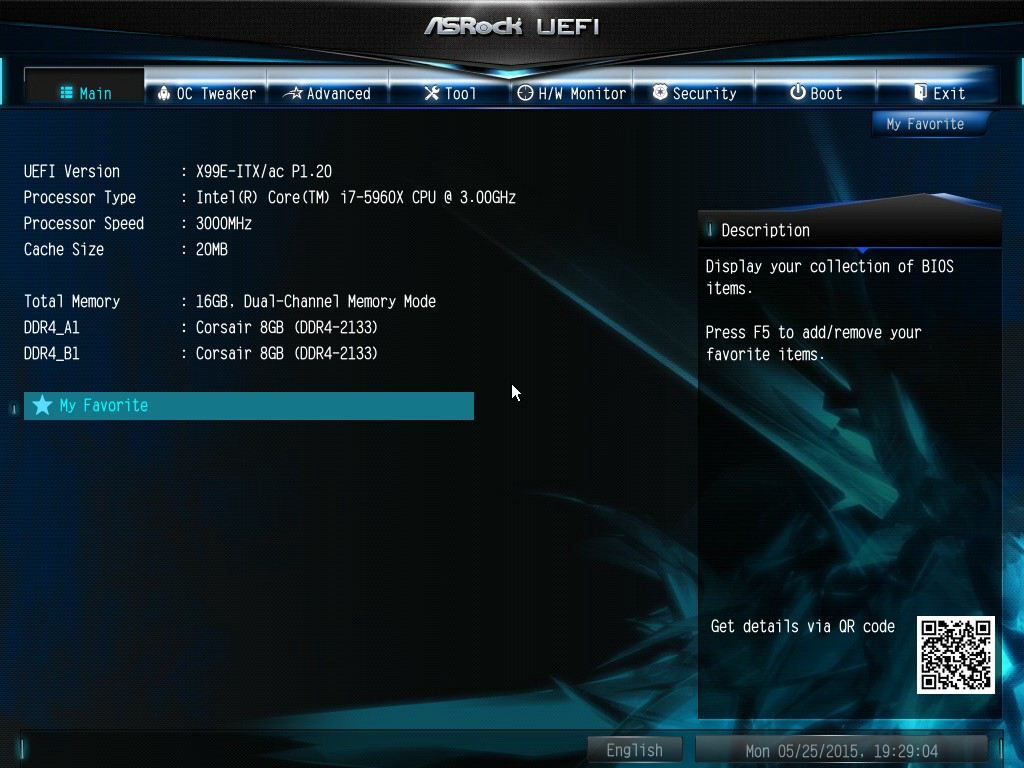
The ASRock BIOS shifted slightly between Z87 and Z97, and it is the Z97 implementation we get on X99. This means the starry background is gone, replaced with a dark and blue-crystalline image. The icons are also reduced to mere text with a small image, and unlike the ASUS BIOS the menu sections are of equal size, which I prefer. There is also an adjustment to the OC Tweaker layout, which we will come to.
There is no ‘Easy Mode’ for the ASRock BIOS, with entry direct into this first Main screen. The right hand side of the BIOS is for description of the option selected, and the main segment shows information such as the BIOS version, CPU installed, CPU speed and memory installed. As mentioned in previous reviews, having some set of information relating to CPU voltages, temperatures and fan speeds might be useful here. If ASRock was to do an Easy Mode, it would make sense to have a one-button overclock option as well.
OC Tweaker takes heed of one of my previous complains about the ASRock overclock options. Previously there used to be a long list of options that continuously grew, depending on what options were left open to the user. For X99, ASRock has condensed these options into separate submenus similar in design to those we see on a GIGABYTE motherboard. Note that ASUS and MSI BIOSes currently go half-way between these extremes, offering some basic options with the more advanced ones in separate menus.
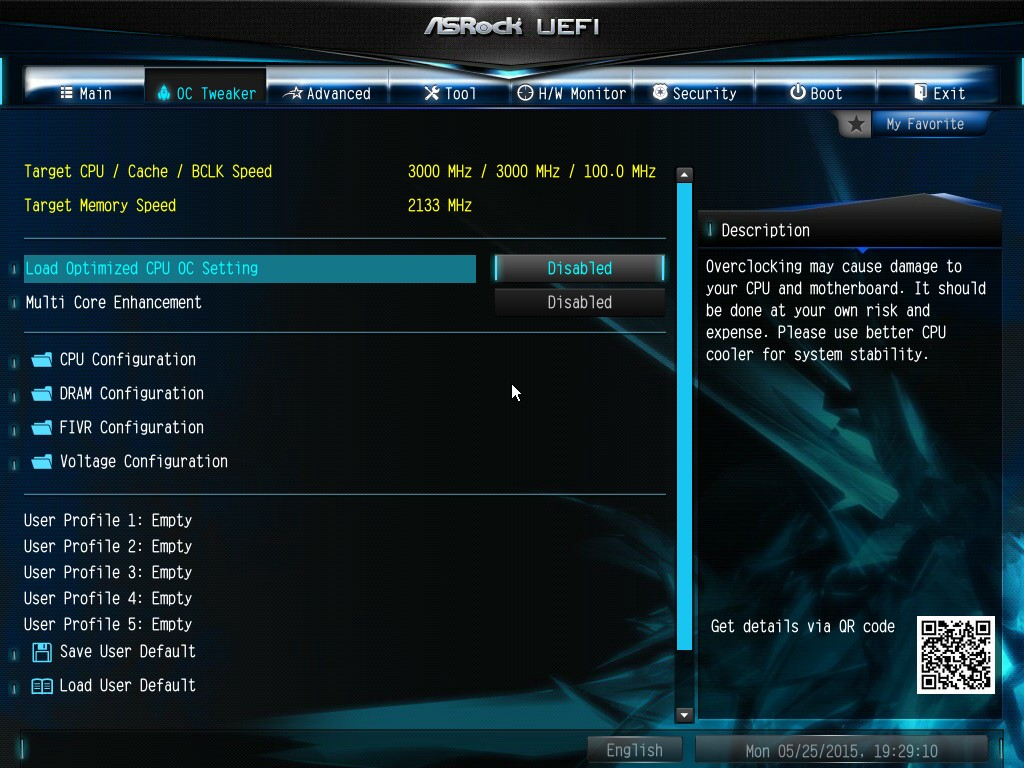
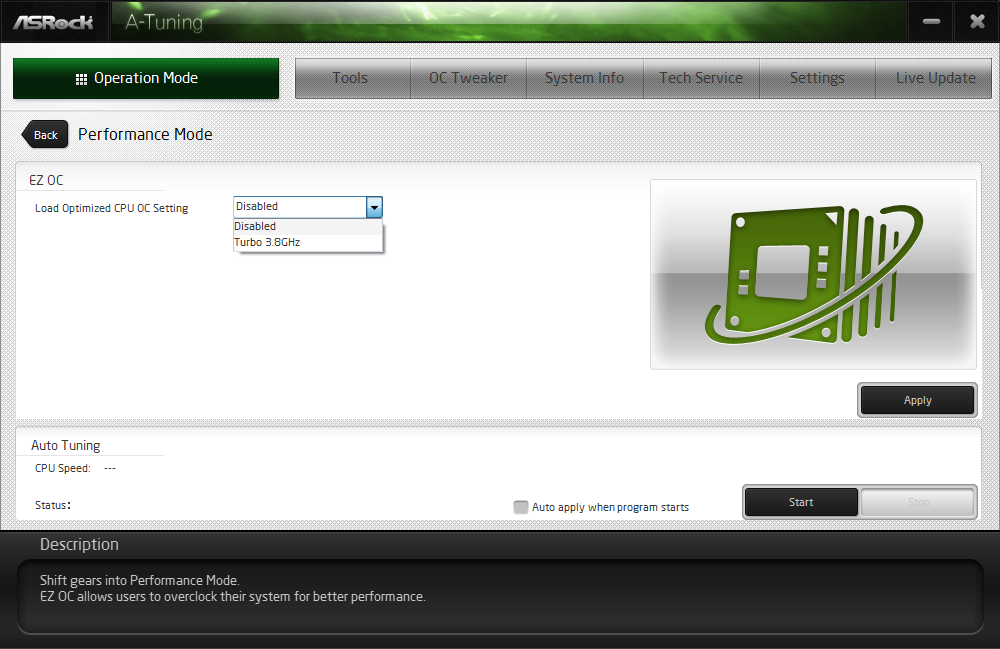
ASRock cuts straight to the chase – the first two options deal with overclocking. We have touched on features like Multi Core Enhancement many times previously, but it is interesting to have it so high up on the list of options. The Optimized CPU OC Setting gives an easy selection for overclocks based on ASRock’s internal testing:
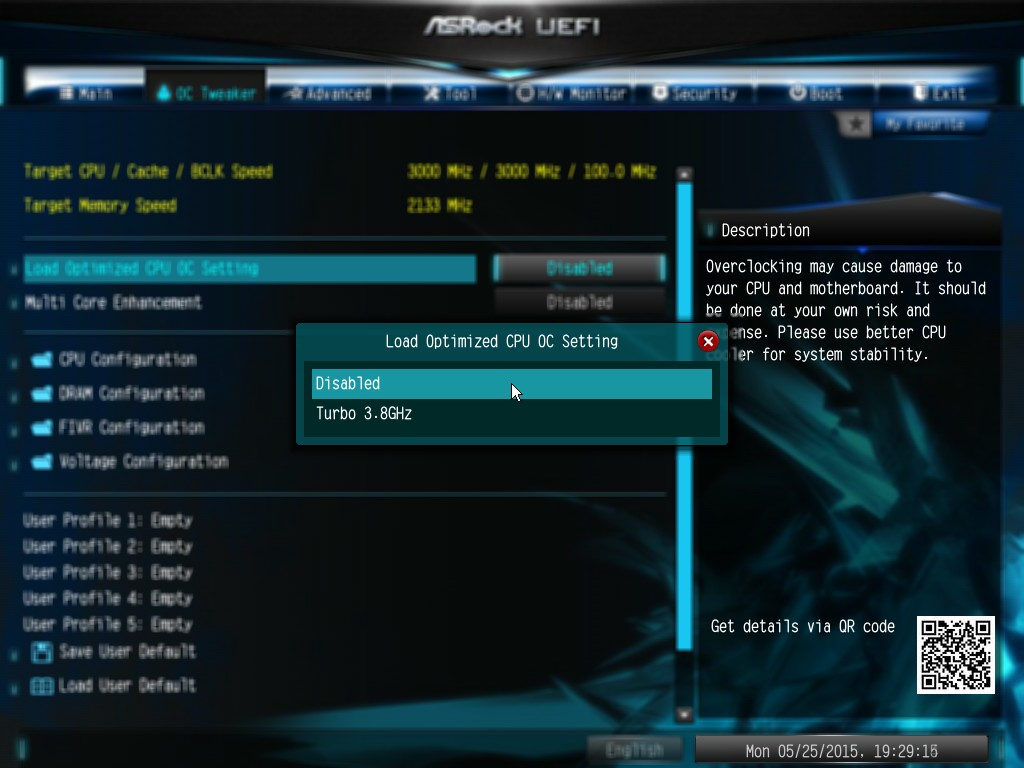
ASRock has been conservative with only offering a 3.8 GHz option here – normally we see 4.0 / 4.2 / 4.4 / 4.5 options, some of which will push the best CPUs. By virtue of having a smaller system, which might be more temperature sensitive, only one option is offered. Personally I would prefer to have the other options as well.
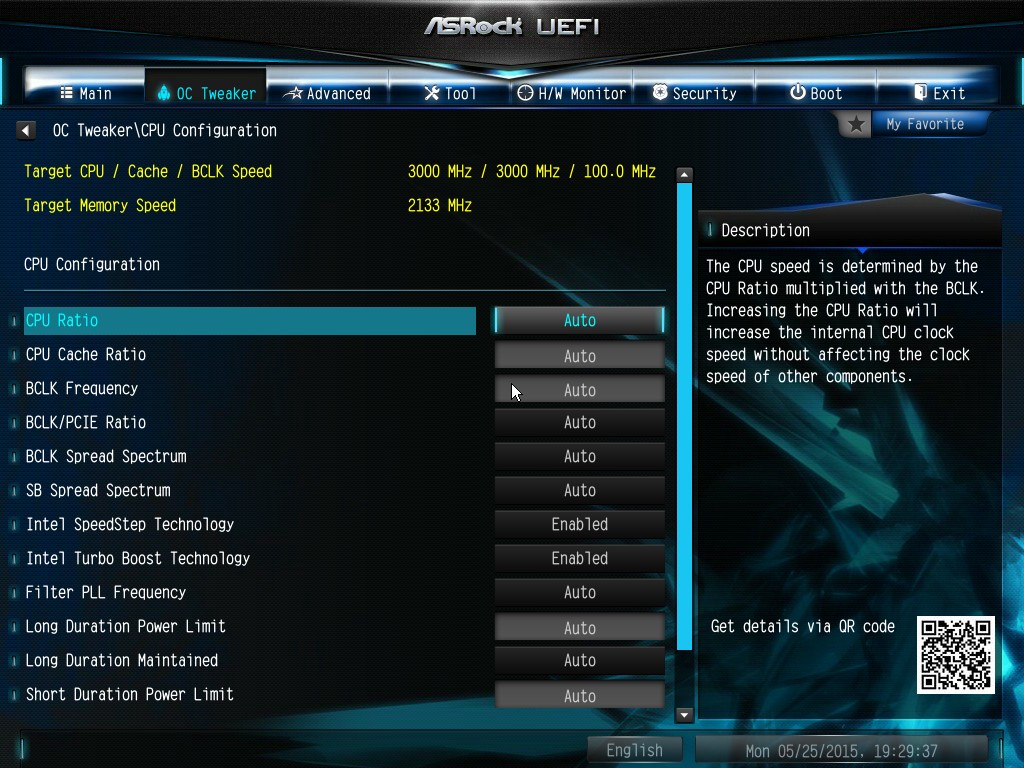
The OC Tweaker menu is split into four sections. CPU Configuration gives options for CPU Ratio, multiplier, frequency, turbo boost and power limits:
DRAM Configuration allows for XMP application, DRAM strap adjustment, DRAM voltage and sub-timing adjustment, all the way through primary timings, secondary timings, tertiaries and others.
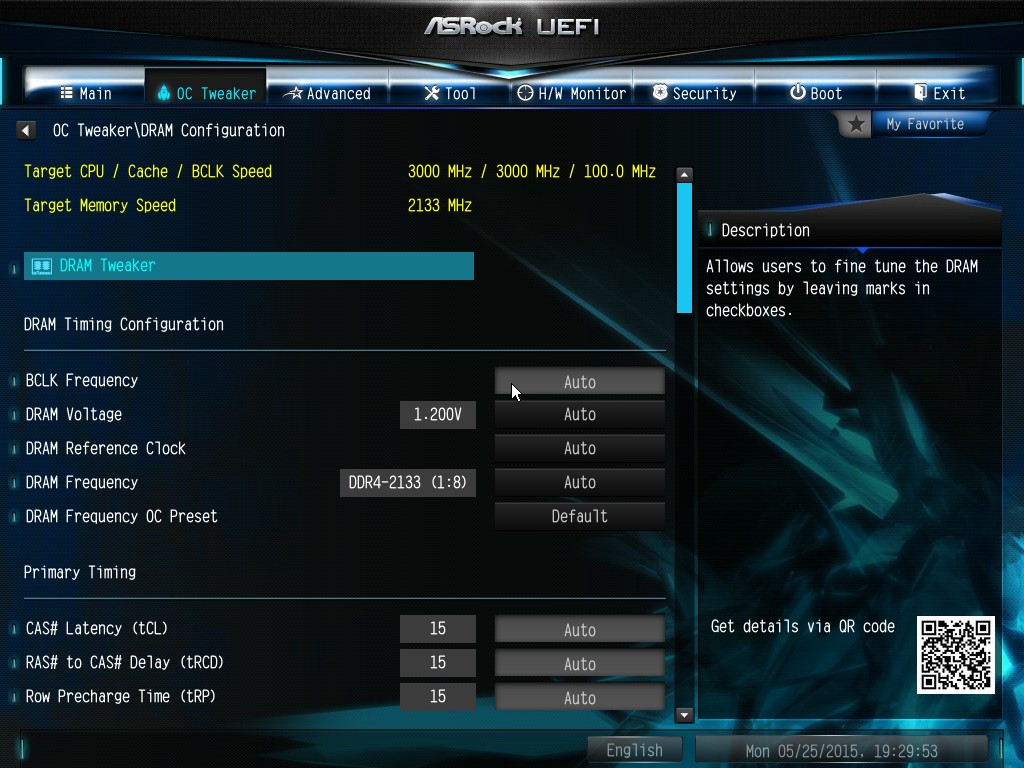
ASRock still uses the DRAM Tweaker function to fine tune the JEDEC and XMP responses to each memory kit. The ASRock BIOS also offers a DRAM Frequency overclocking preset list which will adjust the CPU strap and BCLK frequency needed to achieve various speeds.
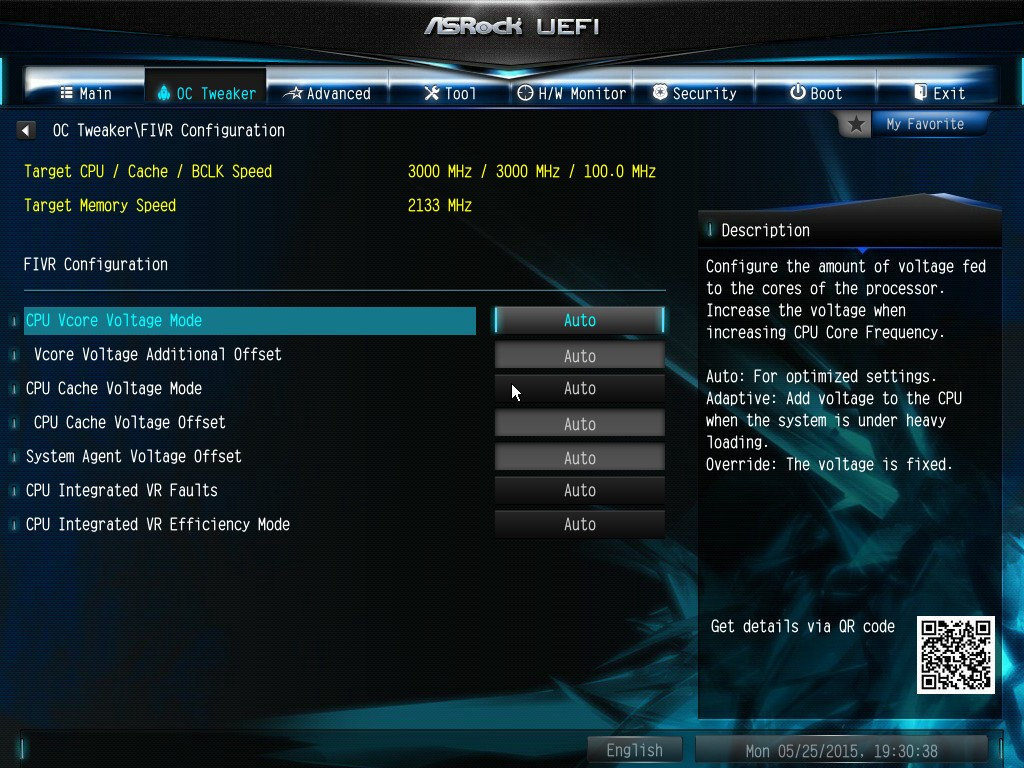
The FIVR Configuration menu from the OC Tweaker page deals primarily with the CPU and CPU Cache/uncore voltages.
The Voltage Configuration menu has the other voltages on the system, including VCIN to the FIVR and load line calibration. The Load Line Calibration option also comes with a handy graph showing what each setting means:

Unfortunately this arrangement of voltages is mildly confusing. Typically an overclocker will adjust the CPU voltage and the Load Line Calibration settings enough to get the right combination, and ASRock has placed these options in two different menus. If the CPU VCore option could be duplicated in the Voltage Configuration menu, this would be preferable.
The Advanced tab deals with other elements of the system configuration, such as the chipset, storage and super IO calibrations. This includes fixing power modes, PCIe linking speeds, disabling or enabling onboard controllers and adjusting RAID configurations.

An adjustment to the X99 BIOS is that the Active Page on Entry setting has been moved here.
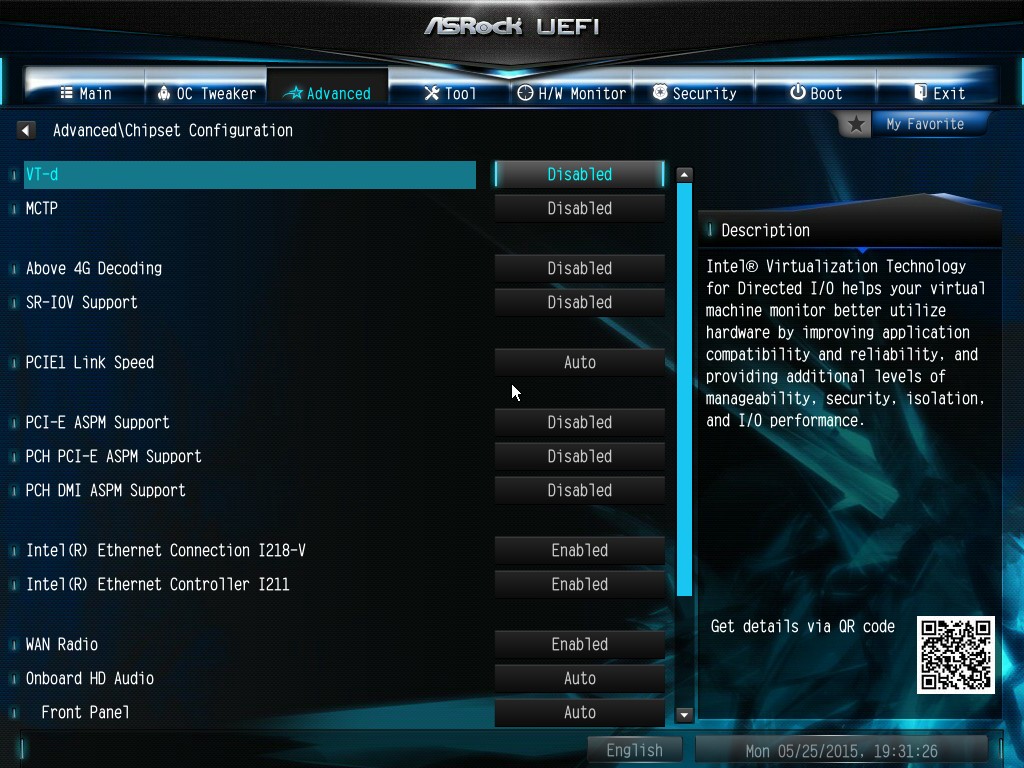
By default the ‘Above 4G Decoding’ inside the Chipset Configuration menu is disabled, for users that want PCIe coprocessors that require this feature.
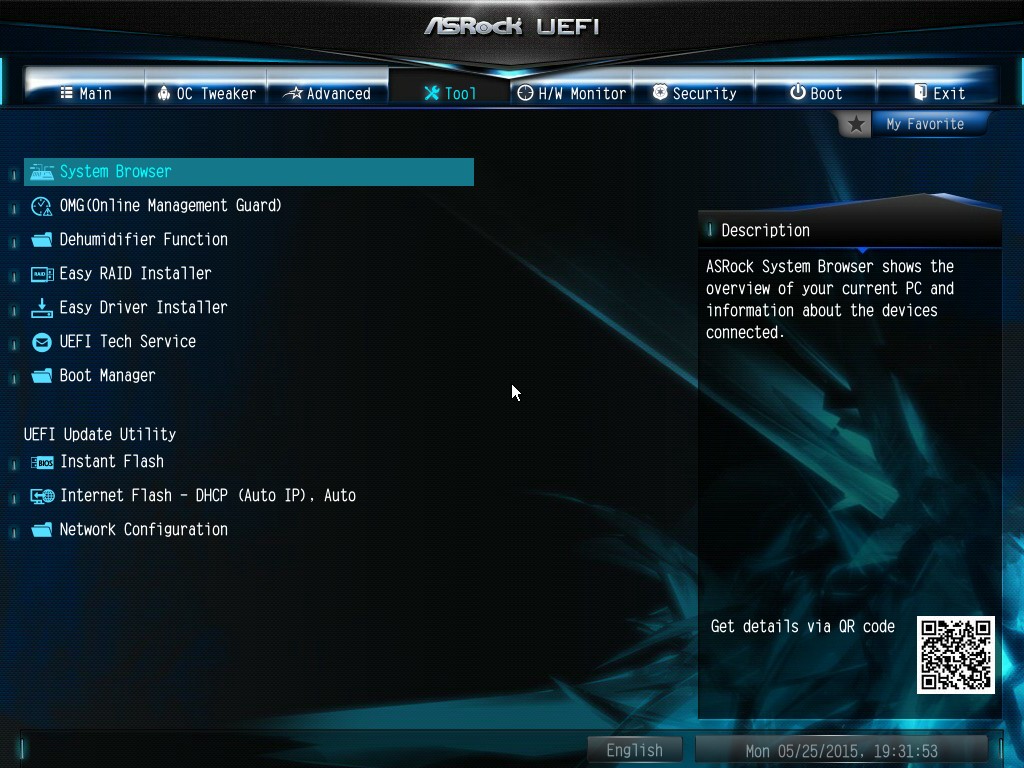
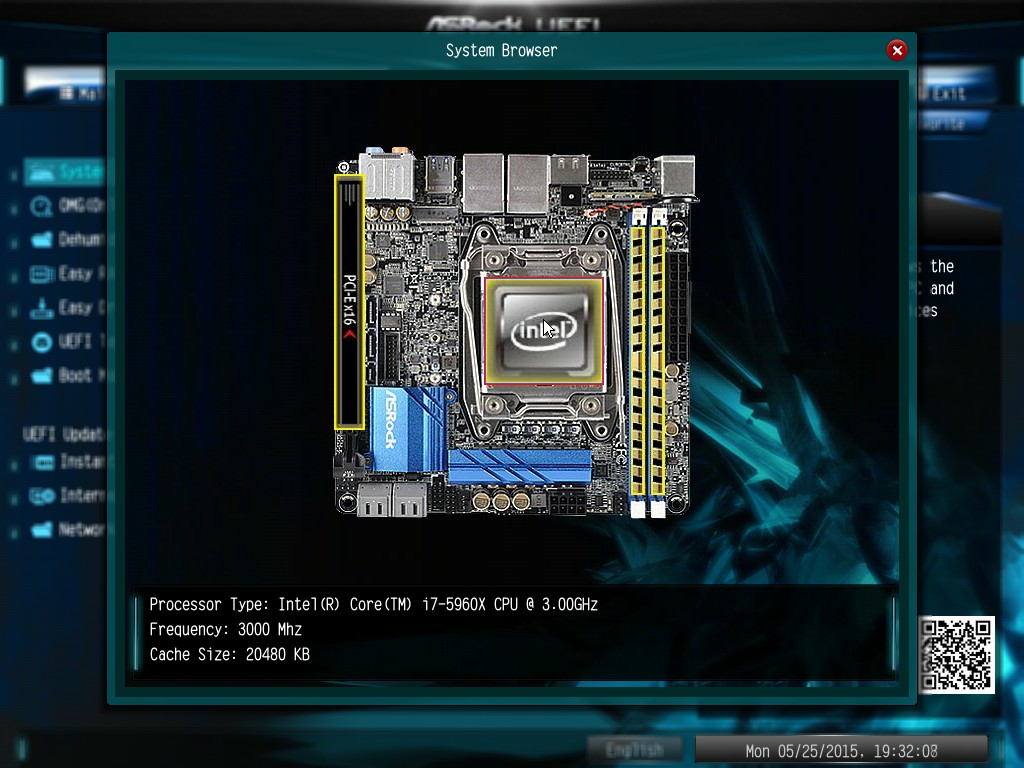
The Tools menu is typically where ASRock tries out its more unusual ideas, although we do not get anything new for X99 that we have not seen on Z97 already. The System Browser shows the different elements of the motherboard and what is detected:
The Online Management Guard (OMG) allows the user to enable or disable the network ports at various times of the day, as determined by the system time:
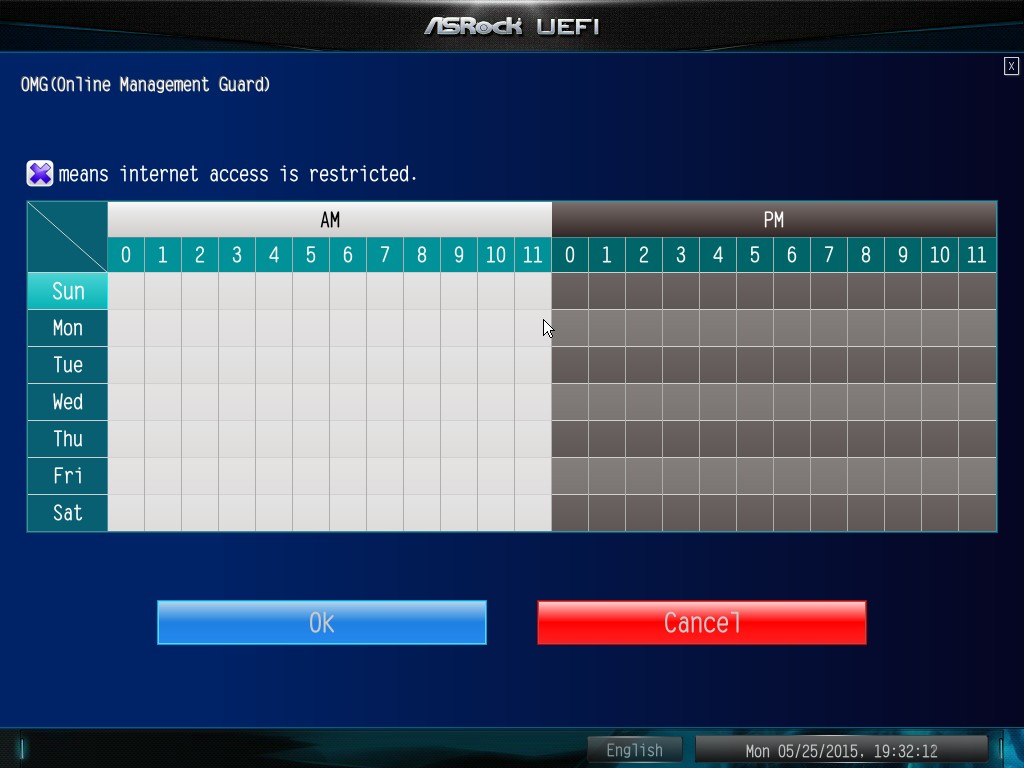
(It is amusing that this feature is aimed more at controlling when a child is allowed online, but X99 is not exactly a system configuration used as secondary machines.)
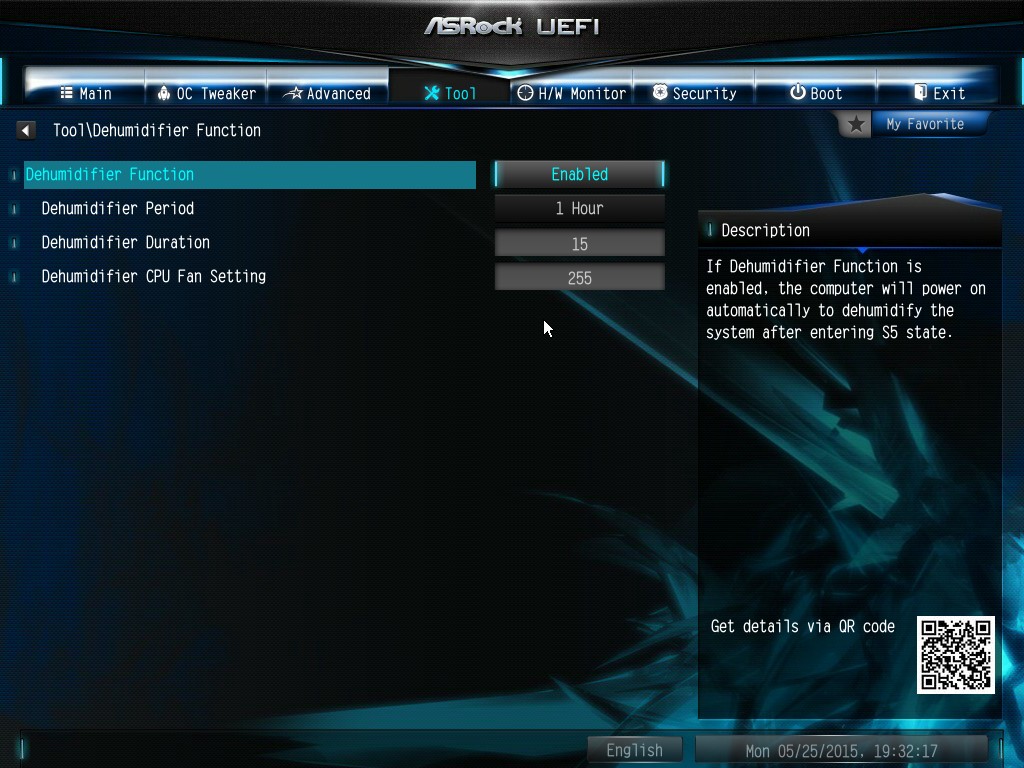
The Dehumidifier function now gets its own sub menu, allowing fans to spin for a fixed time after the machine is in S5:
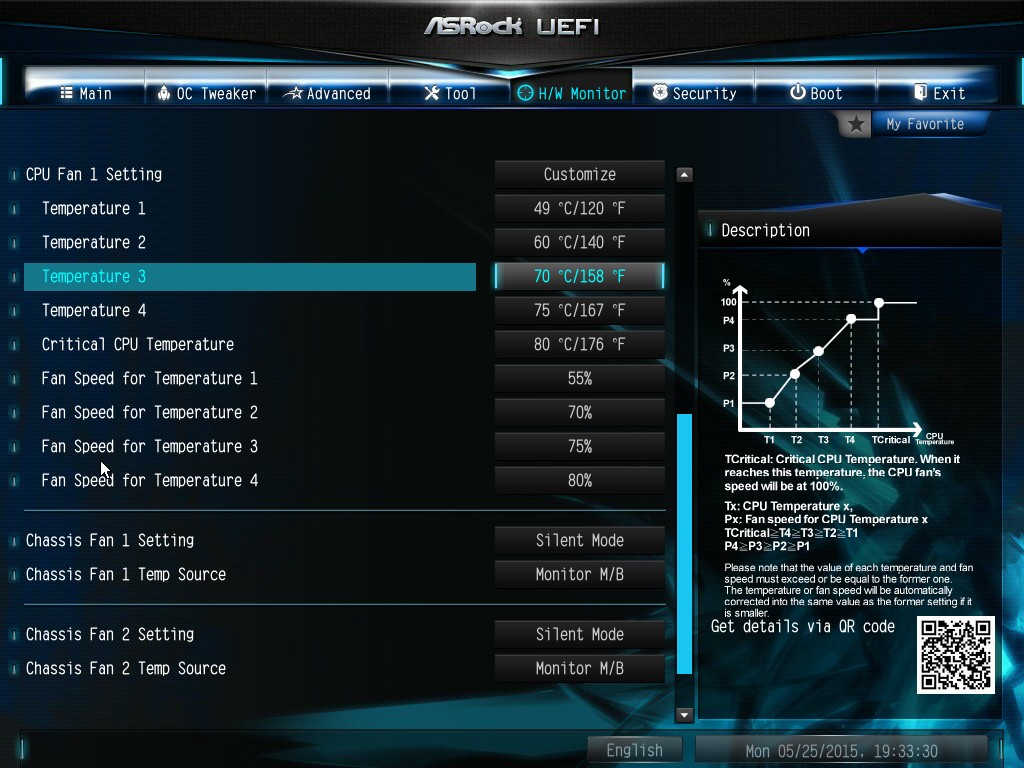
The H/W Monitor tab is where the temperatures, fan speeds and voltage monitoring tools are all kept, and we have seen an effort by the other manufacturers to improve the fan control situation. ASRock now joins them with the FAN-Tastic tuning option, moving into a more interactive type of scenario. This extends the multi-point gradient options into something more clickable, similar to the ASUS implementation. For example, a user can put a fan into one of five modes or customize the profile:

Rather than using the interface, users can do it the older way:
There is also an option to select which temperature sensor is being read from to make these adjustments.
The rest of the BIOS deals with security, boot order and fast boot options. In the Save and Exit menu we do get options for Boot Override:


ASRock X99E-ITX/ac Software
The software package from ASRock has gone through a slow evolution since Z77 into a single interface for all of ASRock’s functionality called A-Tuning. With the overclocking and gaming models the interface is slightly adjusted, but the green tint follows the majority of ASRock’s motherboard range. However the newest element to ASRock’s like is the APP Shop. This is essentially ASRock’s curated version of the Play Store/Microsoft Store, with only software ASRock feels is suited to their motherboard range.
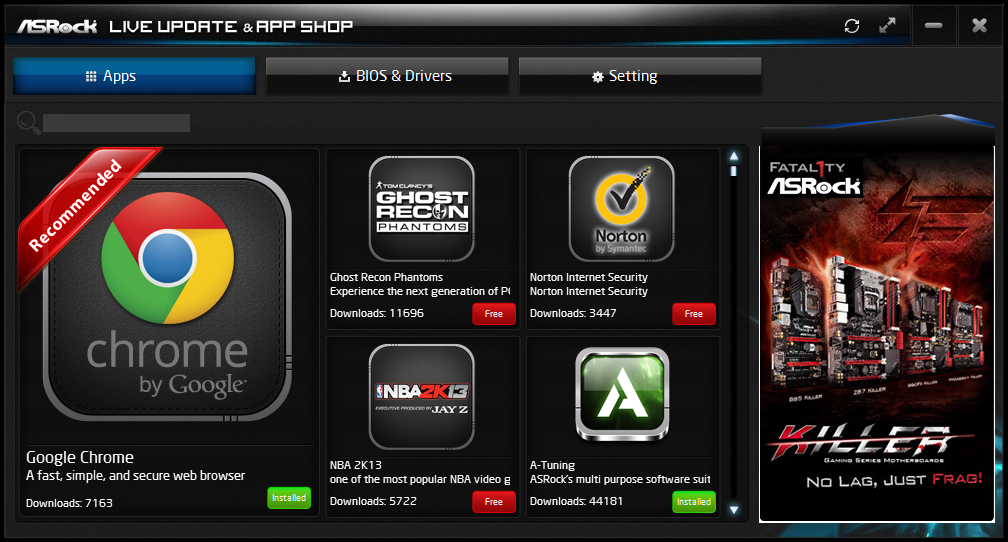
Currently the software is fairly limited to Chrome, ASRock’s own software programs and a few free-to-play titles with some demos. While offering this method to obtain software is interesting, it does open up a lot of questions. Will there be to-pay titles? What happens if one element of the store is filled with malware?
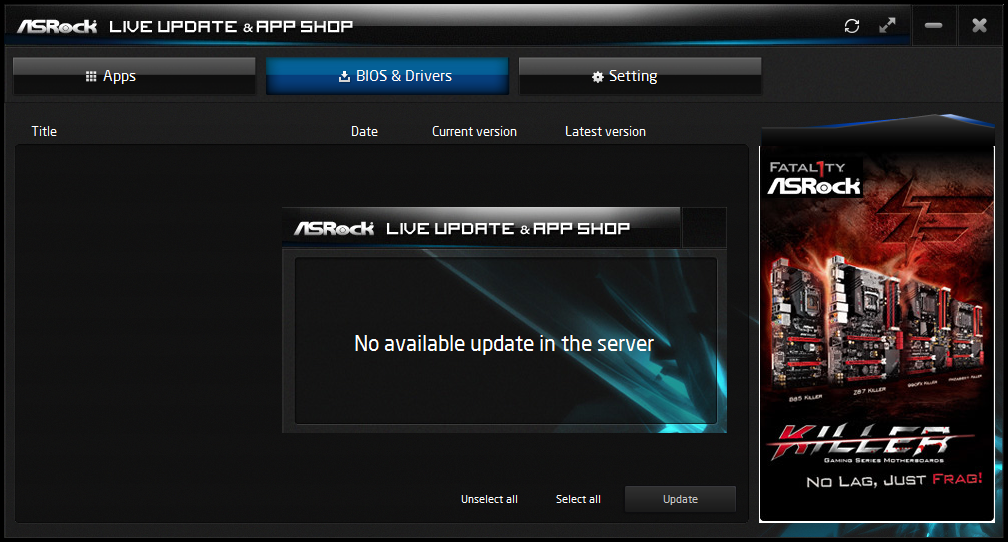
The APP Shop also offers a BIOS and Drivers section to update the system, but as of yet we have not had it working properly in our testing.
One suggestion has been that this software will only update the packages it downloads. There is another update tool in A-Tuning.
A-Tuning
The initial interface revolves around overclocking, giving the following three modes for automatic frequency adjustments:

Power Saving puts the CPU into a low power mode (1.2 GHz on the 5960X) and requires the system have full CPU load before slowly ramping up the speed over the next 6-10 seconds. This keeps power consumption down, but perhaps increases the responsiveness of the system by not having that initial high single core frequency. Standard mode is the default setting, and Performance mode puts the CPU into high frequency mode for any loading. Performance Mode also opens up the Advanced menu:
Here we have a list of Optimized CPU OC Settings similar to the BIOS and an auto tuning section. There is no list of auto tuning options similar to ASUS, for adjusting the stress tests or the optimum CPU temperature, although I would imagine that all the manufacturers might move in that direction at some point in the future.
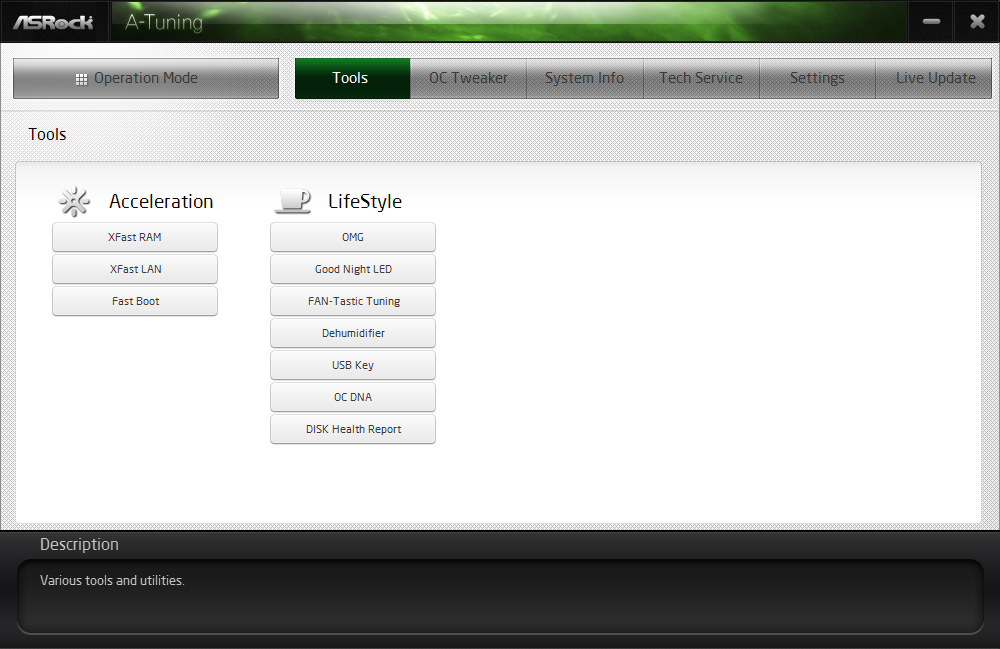
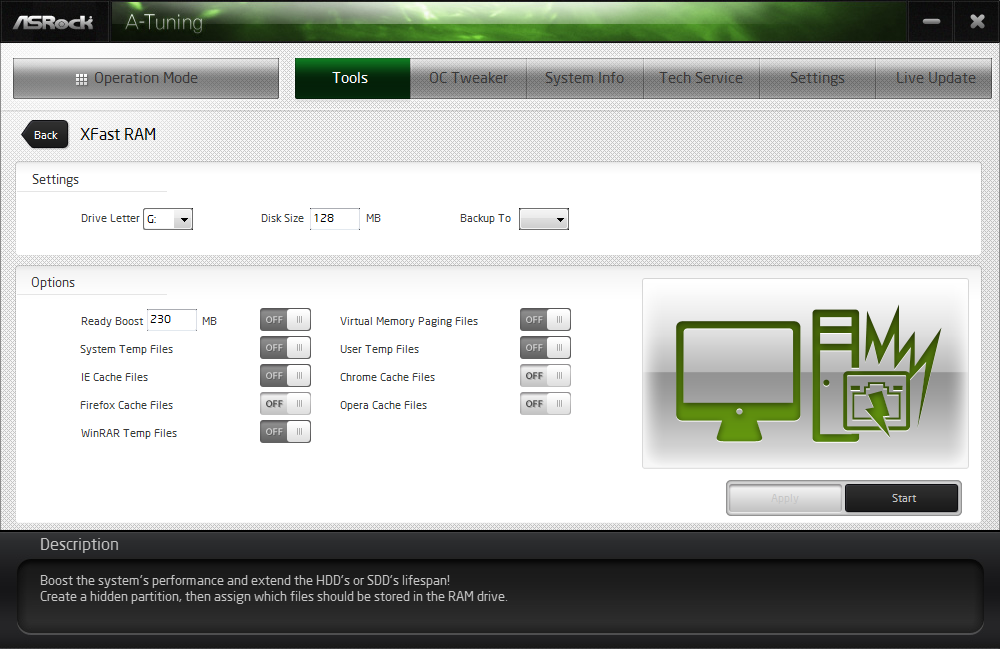
The tools menu has a lot of space for ASRock to add in future features, but currently houses the ones they do have. XFast RAM allows the system to partition some of the RAM into a RAMDisk while also providing some RAMCache options:
XFast LAN is a customized interface for cFos, allowing users to prioritize certain applications over others:
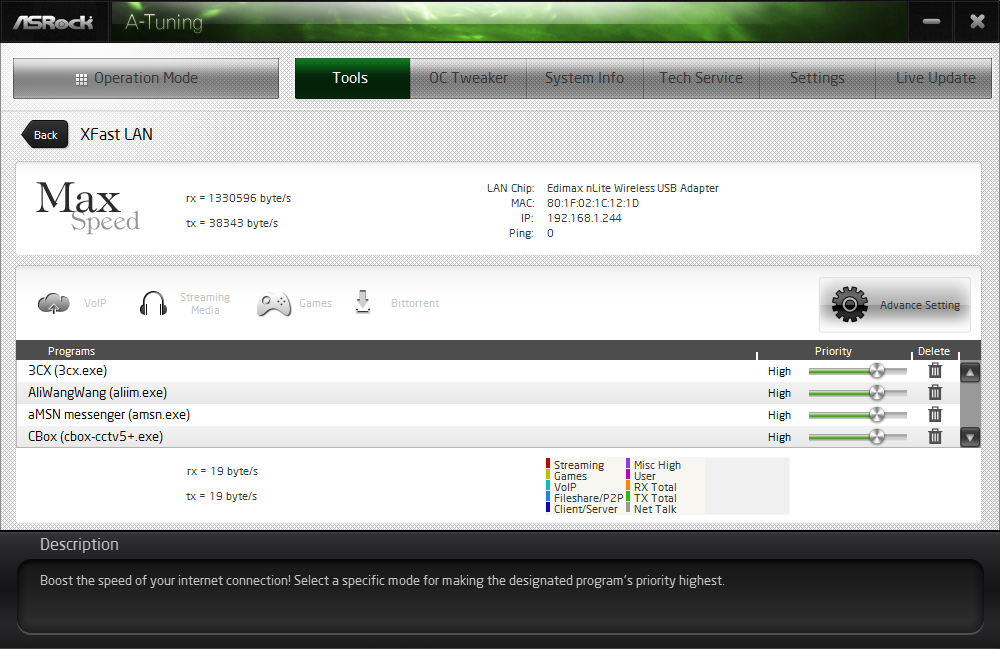
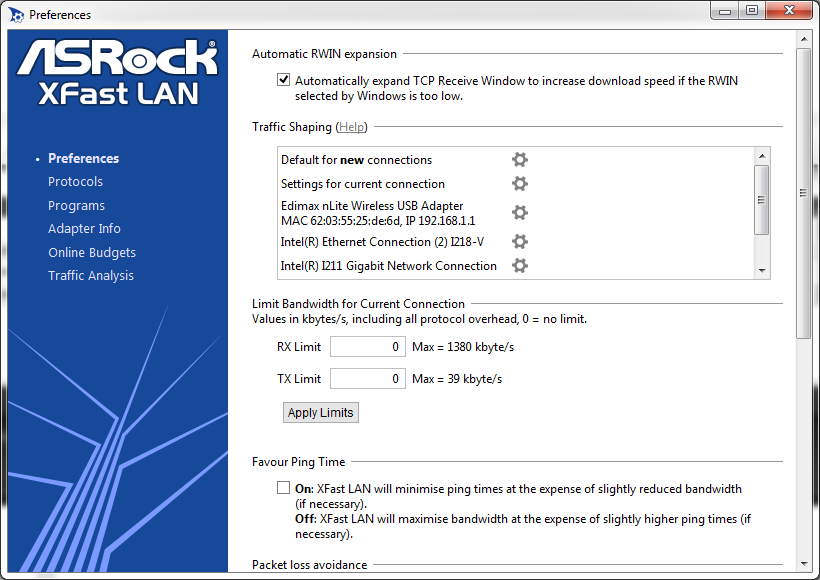
Personally I find this interface extremely cumbersome, especially if there are a lot of applications to deal with. ASRock could design something with less white space and a more efficient amalgamation of the A-Tuning visual dimensions to make the process a lot easier. There is access to cFos directly with the Advance Setting button:
The software works with all the network ports on board.
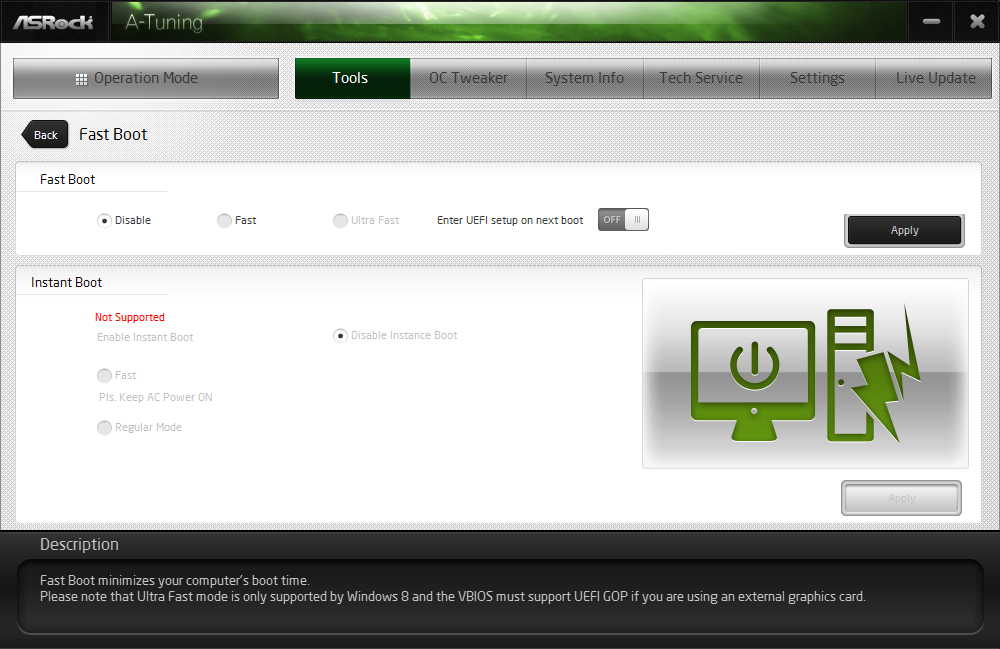
Fast Boot enables options relating to UEFI quick booting by disabling certain options until the OS is loaded:
The Online Management Guard (OMG [!]) has been around for several generations of ASRock motherboards now, and offers the user the ability to disable the networking ports during certain times of the day.

ASRock’s Fan software in the software now mirrors that in the BIOS, giving a better sense for the user in what to adjust:
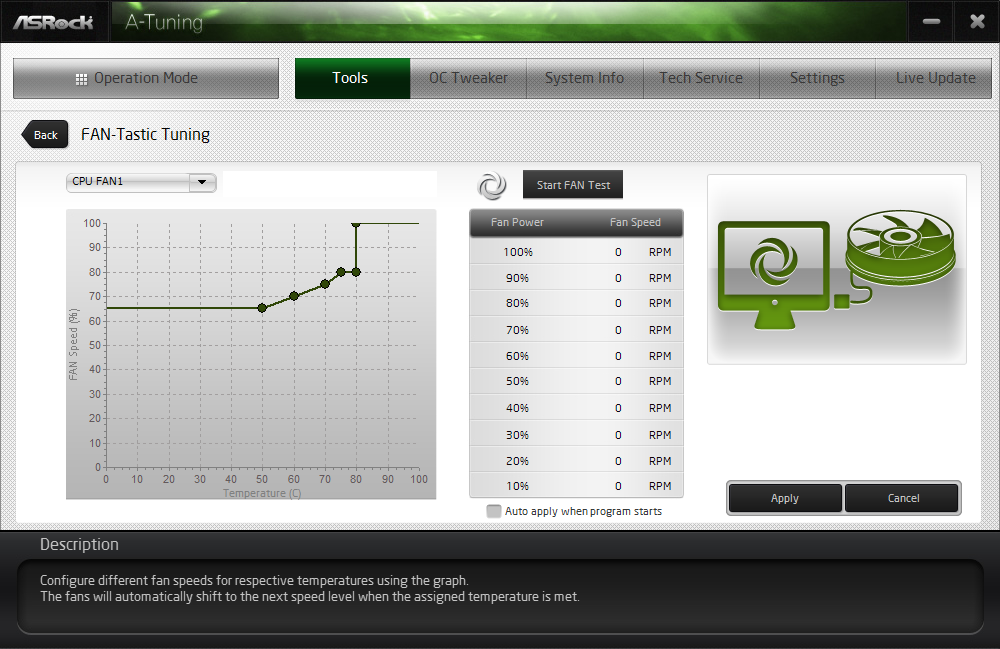
The FAN Test will detect the RPM for a given fan power, although the graph on the left is misnamed – what ASRock calls ‘FAN Speed (%)’ is actually deceptive because it means ‘Fan Power’ and the user has to do the mathematics in their head to adjust based on the table in the middle. If ASRock was on the ball, they would do the conversion in software and adjust the graph to read ‘Fan Speed (RPM)’ and adjust the axis appropriately from lowest Fan Speed to highest Fan Speed.
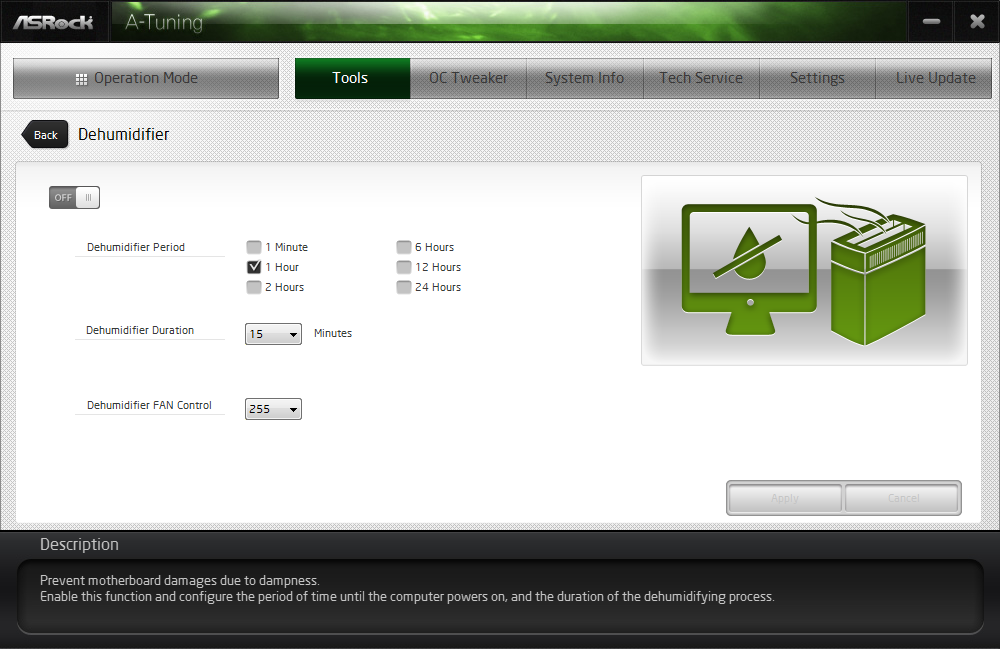
The Dehumidifier tool in the software is identical to that in the BIOS, allowing the system to enable the fans after the system has been shut off in order to equalize the air temperature inside and outside the case. This has benefits in humid environments where the moisture in the air may condense inside the case during a cool night after a hot day.
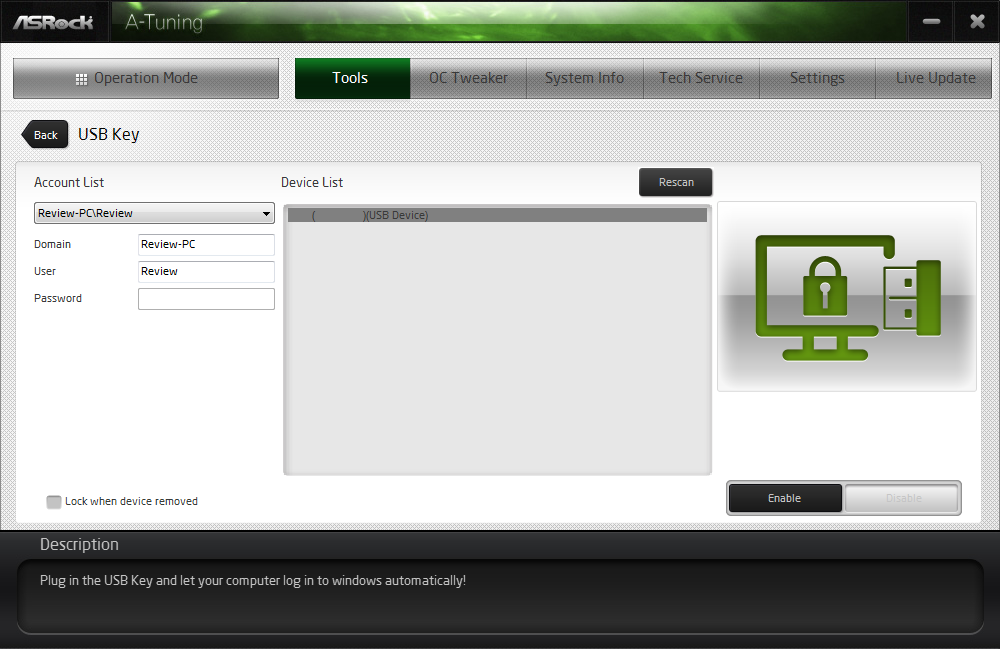
The USB Key tool allows users to assign a particular USB drive with login data for particular Windows users. This means that users need not remember a particular long password to log in, and only specified users are allowed to log in. Though lose the USB drive and lose the ability to log in.

One of the newer tools in ASRock’s list is the DISK Health Report. This gives the critical information on the drives attached to the system, allowing SSD users to see the life of their drive. This drive is very new for my motherboard test beds, as represented by only a few hours in actual operation.
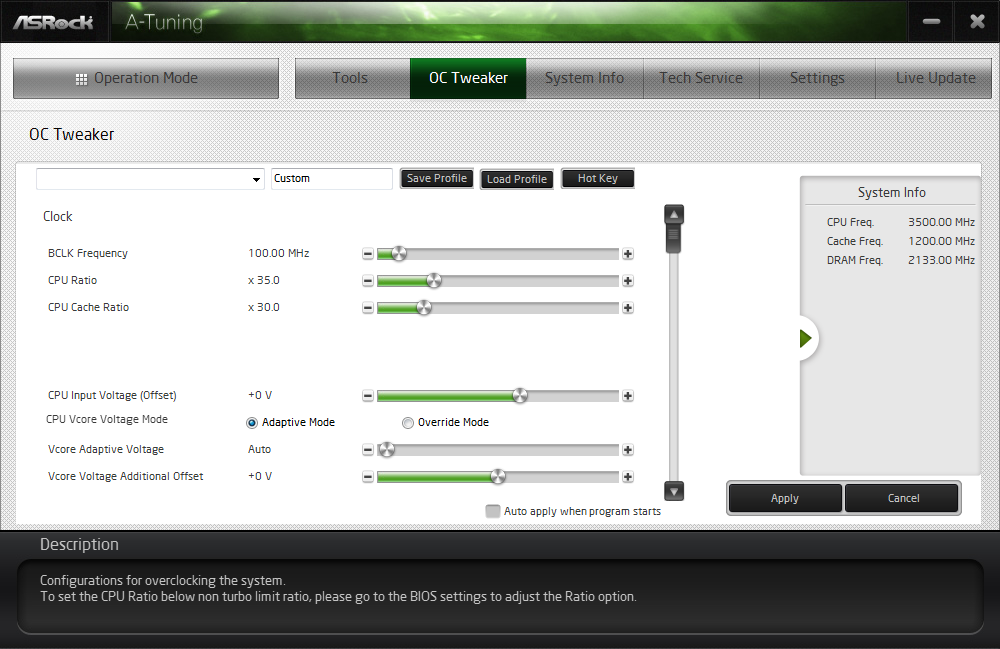
The next tab along the top is the OC Tweaker, featuring the more critical options from the BIOS for manual overclocking along with some options to save overclock profiles. The way this is shown in ASRock’s software is quite user-unfriendly, and I would suggest that the next iteration of the software gives an experienced user an easier way to adjust frequencies and voltages without dealing with sliding bars and scrolling.
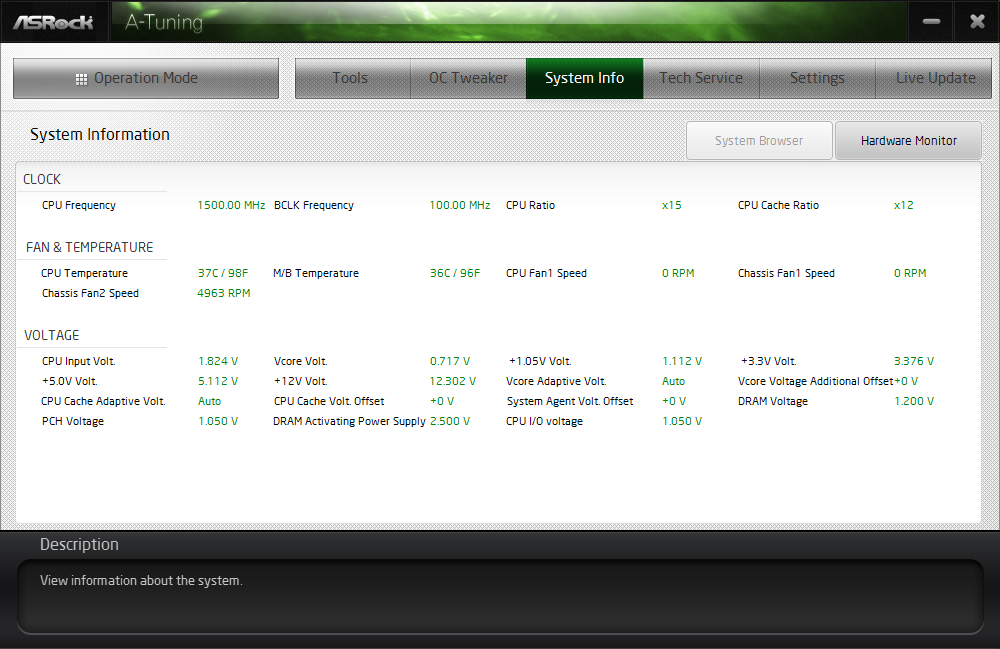
The System Info tab gives the hardware monitor page by default, giving information about the frequencies, fan speeds and voltages in the system. Most other manufacturers have a way of recording this data, or seeing it plotted on a graph while running a stress test, but ASRock is behind on this front at this time.
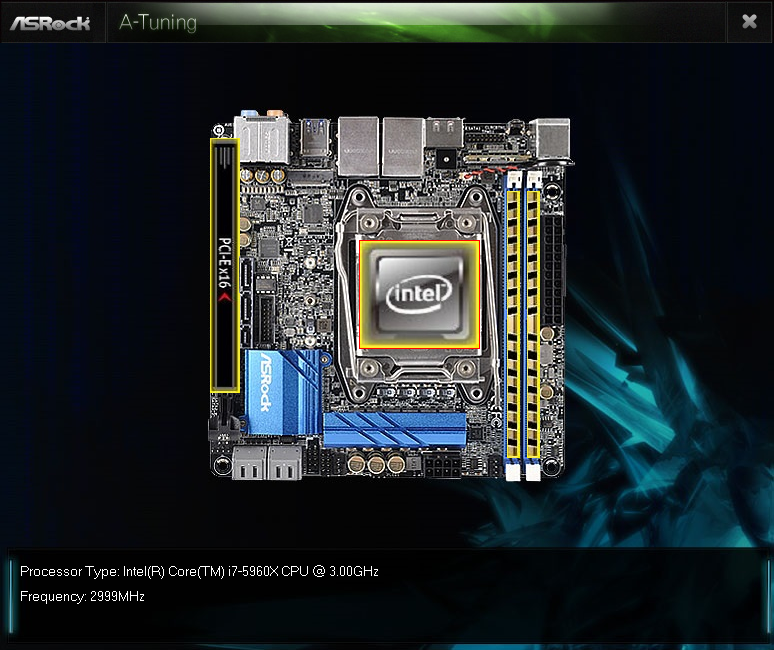
The Hardware Monitor section of System Info is identical to that in the BIOS, showing where hardware is installed with a mouse over giving basic details. This is handy for investigating which memory stick, USB or PCIe device is not being detected.
The Live Update tab is, by comparison to MSI, limited. Although I knew there were updates to the platform when I run this software, it failed to find the updated drivers. Here it also does not say how big each download is. If a user is on a limited or slow bandwidth package having to download 300MB of audio or graphics drivers can be detrimental.
While ASRock’s software package is presented in a good way, and there are a number of helpful tools, there are various aspects here that miss the mark in terms of user experience.


ASRock X99E-ITX/ac In The Box
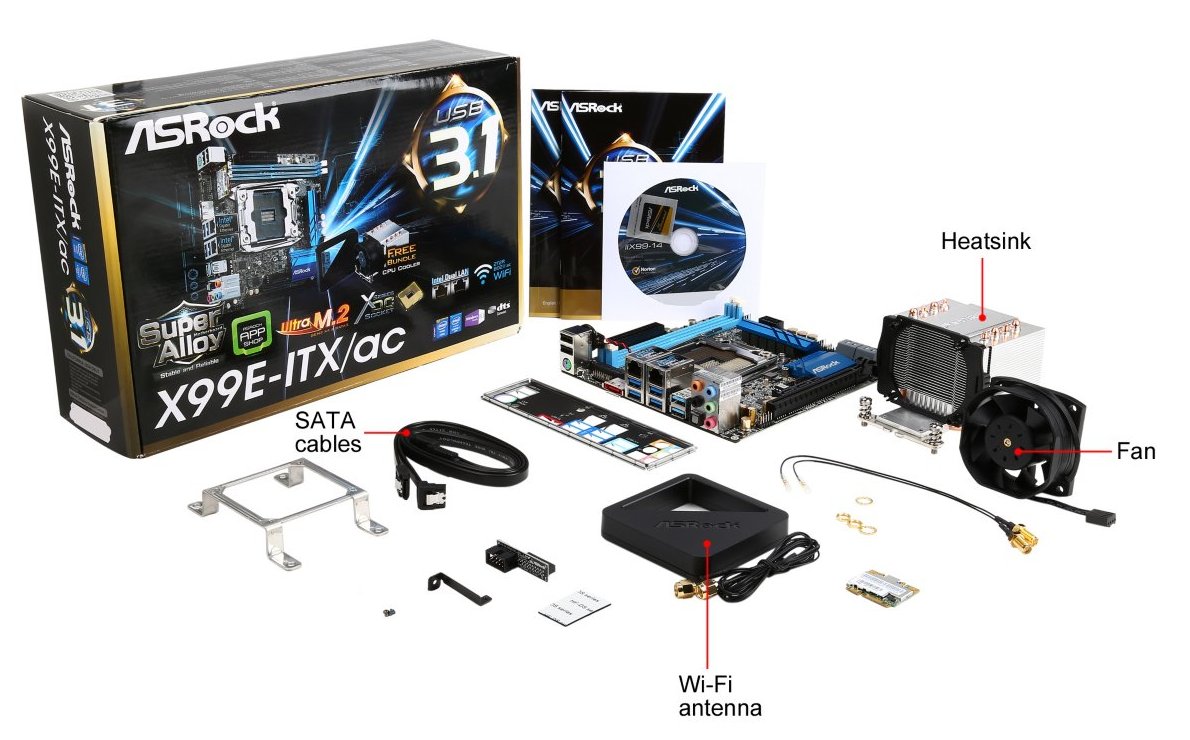
With part of the focus of X99 on connectivity, and the size of the X99E-ITX limiting that connectivity, it makes it hard to judge what should exactly be in the box here. With only six SATA ports in play, we could get a full assortment of SATA cables but the inclusion of WiFi also brings in an antenna solution for users to play with. Also, by virtue of the narrow ILM socket used by the motherboard, in order to solve sourcing issues for coolers ASRock has bundled one form Dynatron in with the package, so every user should have an appropriate cooler.
In the X99E-ITX we get the following:
Driver DVD
Manuals
Rear IO Shield
Two SATA Cables
Dynatron Heatsink and Fan
Magnetic Liquid Cooler Bracket
WiFi Module and support
WiFi Antenna
Many thanks to...
We must thank the following companies for kindly providing hardware for our test bed:
Thank you to AMD for providing us with the R9 290X 4GB GPUs.
Thank you to ASUS for providing us with GTX 980 Strix GPUs and the R7 240 DDR3 GPU.
Thank you to ASRock and ASUS for providing us with some IO testing kit.
Thank you to Cooler Master for providing us with Nepton 140XL CLCs.
Thank you to Corsair for providing us with an AX1200i PSU.
Thank you to Crucial for providing us with MX200 SSDs.
Thank you to G.Skill and Corsair for providing us with memory.
Thank you to MSI for providing us with the GTX 770 Lightning GPUs.
Thank you to OCZ for providing us with PSUs.
Thank you to Rosewill for providing us with PSUs and RK-9100 keyboards.
Test Setup
| Test Setup | |
| Processor | Intel Core i7-5960X ES 8 Cores, 16 Threads, 3.0 GHz (3.5 GHz Turbo) |
| Motherboards | ASRock X99E-ITX/ac |
| Cooling | Dynatron - Included in Package |
| Power Supply | OCZ 1250W Gold ZX Series Corsair AX1200i Platinum PSU |
| Memory | Corsair DDR4-2133 C15 2x8 GB 1.2V or G.Skill Ripjaws 4 DDR4-2133 C15 2x8 GB 1.2V |
| Memory Settings | JEDEC @ 2133 |
| Video Cards | MSI GTX 770 Lightning 2GB (1150/1202 Boost) ASUS R7 240 2GB |
| Hard Drive | Crucial MX200 1TB |
| Optical Drive | LG GH22NS50 |
| Case | Open Test Bed |
| Operating System | Windows 7 64-bit SP1 |
ASRock X99E-ITX/ac Overclocking
Experience with ASRock X99E-ITX/ac
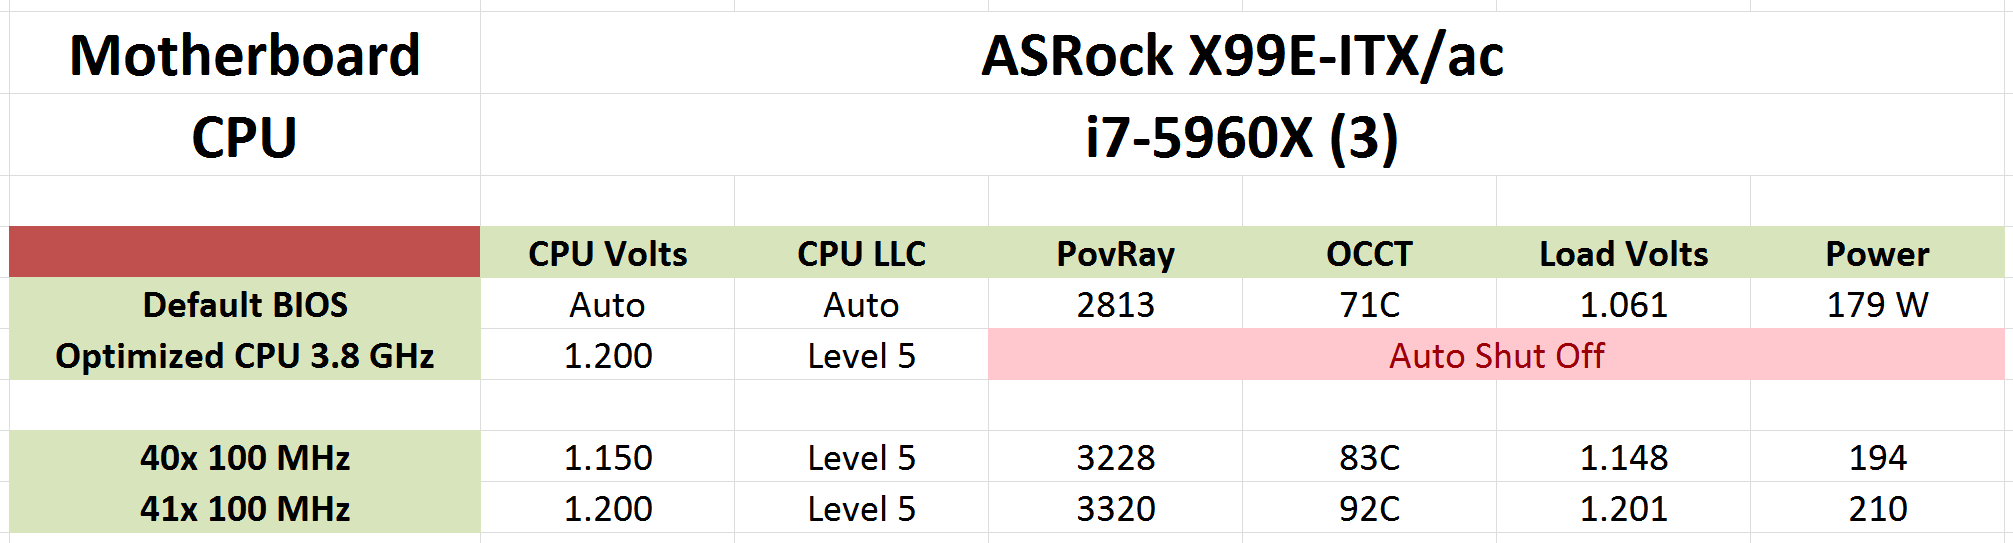
Needless to say, the X99E-ITX is not perhaps built with overclocking in mind. The only option given for automatic overclockers is 3.8 GHz in both the BIOS and the software, perhaps suggesting that ASRock feels that the small form factor systems that the motherboard is aimed at will not allow sufficient airflow. Either that or the lower mass of the narrow ILM socket also affects temperatures, or the small power delivery heatsinks might also be a limiting factor. That being said, anyone with a good cooler can still try their hand at extreme overclocking.
In our testing, the automatic overclock option actually failed at idle – the system shut off similar to an overheating system. We saw that the option actually placed the CPU at 1.200 volts, which is not very high, but there might be other factors in play here. In our manual testing, 1.200 volts actually gives a high temperature but only at load, suggesting that the automatic overclocking option actually adjusts some other factors that causes the system to fail.
Methodology
Our standard overclocking methodology is as follows. We select the automatic overclock options and test for stability with PovRay and OCCT to simulate high-end workloads. These stability tests aim to catch any immediate causes for memory or CPU errors.
For manual overclocks, based on the information gathered from previous testing, starts off at a nominal voltage and CPU multiplier, and the multiplier is increased until the stability tests are failed. The CPU voltage is increased gradually until the stability tests are passed, and the process repeated until the motherboard reduces the multiplier automatically (due to safety protocol) or the CPU temperature reaches a stupidly high level (100ºC+). Our test bed is not in a case, which should push overclocks higher with fresher (cooler) air.
Overclock Results
System Performance
Power Consumption
Power consumption was tested on the system while in a single MSI GTX 770 Lightning GPU configuration with a wall meter connected to the OCZ 1250W power supply. This power supply is Gold rated, and as I am in the UK on a 230-240 V supply, leads to ~75% efficiency > 50W, and 90%+ efficiency at 250W, suitable for both idle and multi-GPU loading. This method of power reading allows us to compare the power management of the UEFI and the board to supply components with power under load, and includes typical PSU losses due to efficiency. These are the real world values that consumers may expect from a typical system (minus the monitor) using this motherboard.
While this method for power measurement may not be ideal, and you feel these numbers are not representative due to the high wattage power supply being used (we use the same PSU to remain consistent over a series of reviews, and the fact that some boards on our test bed get tested with three or four high powered GPUs), the important point to take away is the relationship between the numbers. These boards are all under the same conditions, and thus the differences between them should be easy to spot.
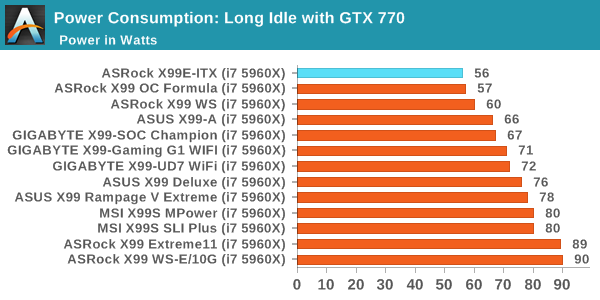
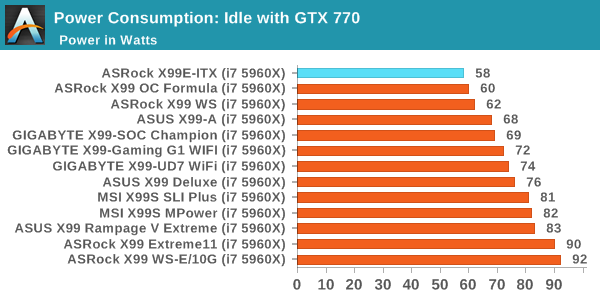
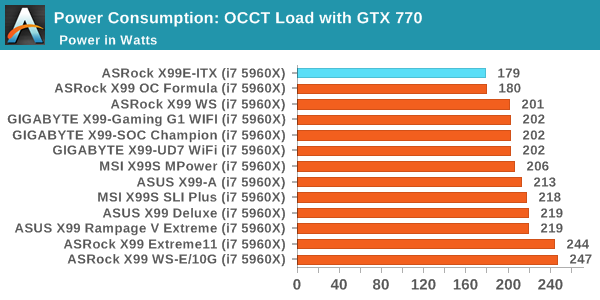
With the small form factor system, one would hope that the power consumption is low due to the lack of other components compared to the larger ATX and EATX motherboards. Thankfully, the X99E-ITX falls in line, almost matching the OC Formula but coming top in each metric. Part of this will be due to only having two modules of DRAM installed.
Windows 7 POST Time
Different motherboards have different POST sequences before an operating system is initialized. A lot of this is dependent on the board itself, and POST boot time is determined by the controllers on board (and the sequence of how those extras are organized). As part of our testing, we look at the POST Boot Time using a stopwatch. This is the time from pressing the ON button on the computer to when Windows 7 starts loading. (We discount Windows loading as it is highly variable given Windows specific features.)
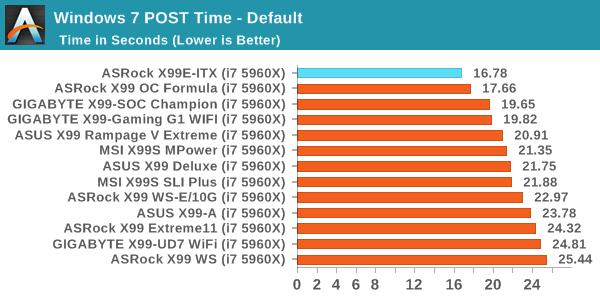

By virtue of having fewer components, one would also assume a quicker POST time. One of the big issues with POST time for X99 is DRAM testing/training at POST, which can take ten seconds and is required to ensure stability. By virtue of having fewer memory channels to be populated, the X99E-ITX gets nearer 15 seconds than the 20 second benchmark we normally have with X99 motherboards.
Rightmark Audio Analyzer 6.2.5
Rightmark:AA indicates how well the sound system is built and isolated from electrical interference (either internally or externally). For this test we connect the Line Out to the Line In using a short six inch 3.5mm to 3.5mm high-quality jack, turn the OS speaker volume to 100%, and run the Rightmark default test suite at 192 kHz, 24-bit. The OS is tuned to 192 kHz/24-bit input and output, and the Line-In volume is adjusted until we have the best RMAA value in the mini-pretest. We look specifically at the Dynamic Range of the audio codec used on board, as well as the Total Harmonic Distortion + Noise.
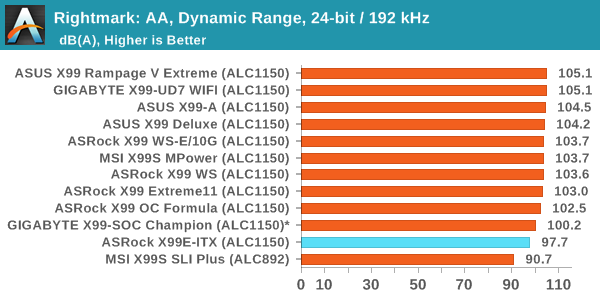
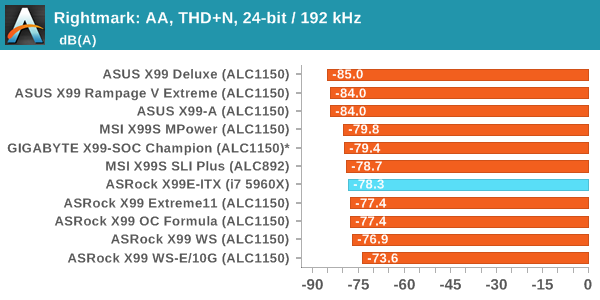
By having a smaller motherboard, ASRock is unable to implement the normal features around their improved ALC1150 audio solution. This technically should give a slightly noisier signal, and as a result the X99E-ITX/ac has a lower dynamic range than the other X99 motherboards with the ALC1150.
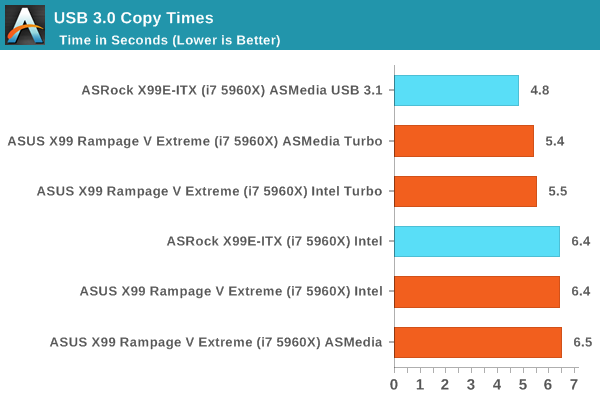
USB Backup
For this benchmark, we transfer a set size of files from the SSD to the USB drive using DiskBench, which monitors the time taken to transfer. The files transferred are a 1.52 GB set of 2867 files across 320 folders – 95% of these files are small typical website files, and the rest (90% of the size) are small 30 second HD videos. In an update to pre-Z87 testing, we also run MaxCPU to load up one of the threads during the test which improves general performance up to 15% by causing all the internal pathways to run at full speed.
Due to the introduction of USB 3.1, as of June 2015 we are adjusting our test to use a dual mSATA USB 3.1 Type-C device which should be capable of saturating both USB 3.0 and USB 3.1 connections. We still use the same data set as before, but now use the new device. Results are shown as seconds taken to complete the data transfer. As this way of testing is still new, we have only a few results so far.
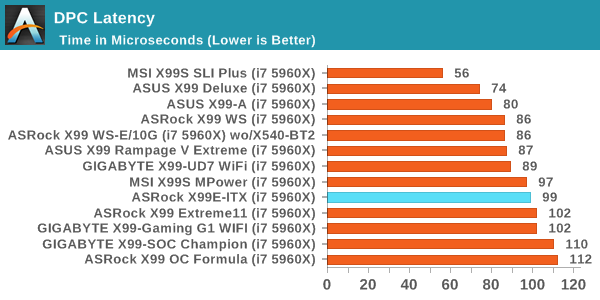
DPC Latency
Deferred Procedure Call latency is a way in which Windows handles interrupt servicing. In order to wait for a processor to acknowledge the request, the system will queue all interrupt requests by priority. Critical interrupts will be handled as soon as possible, whereas lesser priority requests such as audio will be further down the line. If the audio device requires data, it will have to wait until the request is processed before the buffer is filled.
If the device drivers of higher priority components in a system are poorly implemented, this can cause delays in request scheduling and process time. This can lead to an empty audio buffer and characteristic audible pauses, pops and clicks. The DPC latency checker measures how much time is taken processing DPCs from driver invocation. The lower the value will result in better audio transfer at smaller buffer sizes. Results are measured in microseconds.
CPU Performance
Readers of our motherboard review section will have noted the trend in modern motherboards to implement a form of MultiCore Enhancement / Acceleration / Turbo (read our report here) on their motherboards. This does several things, including better benchmark results at stock settings (not entirely needed if overclocking is an end-user goal) at the expense of heat and temperature. It also gives in essence an automatic overclock which may be against what the user wants. Our testing methodology is ‘out-of-the-box’, with the latest public BIOS installed and XMP enabled, and thus subject to the whims of this feature. It is ultimately up to the motherboard manufacturer to take this risk – and manufacturers taking risks in the setup is something they do on every product (think C-state settings, USB priority, DPC Latency / monitoring priority, memory subtimings at JEDEC). Processor speed change is part of that risk, and ultimately if no overclocking is planned, some motherboards will affect how fast that shiny new processor goes and can be an important factor in the system build.
For reference, the X99E-ITX/ac has Multicore Turbo disabled by default in BIOS P1.20. The important element to note here is if dual channel memory has an effect in performance.
Point Calculations – 3D Movement Algorithm Test: link
3DPM is a self-penned benchmark, taking basic 3D movement algorithms used in Brownian Motion simulations and testing them for speed. High floating point performance, MHz and IPC wins in the single thread version, whereas the multithread version has to handle the threads and loves more cores. For a brief explanation of the platform agnostic coding behind this benchmark, see my forum post here.
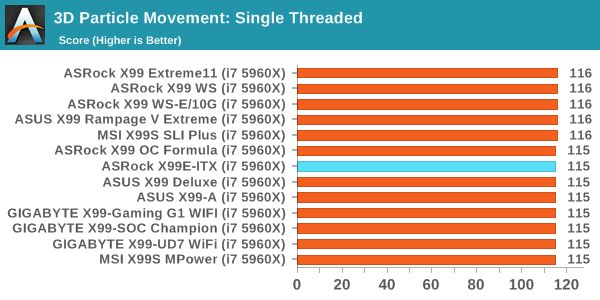
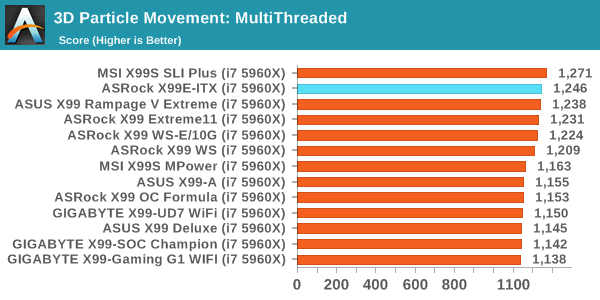
3DPM is not DRAM dependent, so dual channel memory has no issue here.
Compression – WinRAR 5.0.1: link
Our WinRAR test from 2013 is updated to the latest version of WinRAR at the start of 2014. We compress a set of 2867 files across 320 folders totaling 1.52 GB in size – 95% of these files are small typical website files, and the rest (90% of the size) are small 30 second 720p videos.
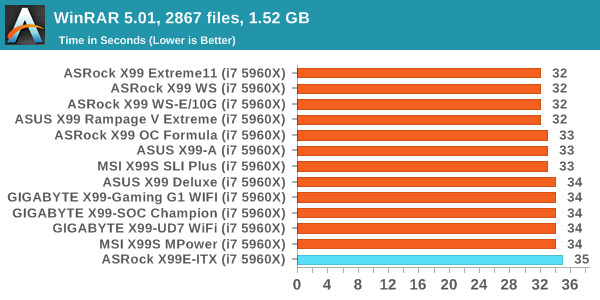
WinRAR is typically a benchmark that tackles DRAM, and we see that the dual channel orientation has a small detriment here.
Image Manipulation – FastStone Image Viewer 4.9: link
Similarly to WinRAR, the FastStone test us updated for 2014 to the latest version. FastStone is the program I use to perform quick or bulk actions on images, such as resizing, adjusting for color and cropping. In our test we take a series of 170 images in various sizes and formats and convert them all into 640x480 .gif files, maintaining the aspect ratio. FastStone does not use multithreading for this test, and thus single threaded performance is often the winner.
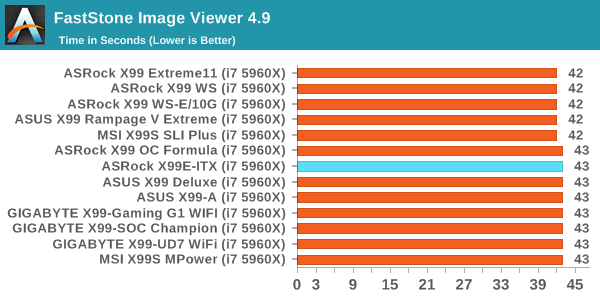
FastStone is a CPU benchmark, so no difference here.
Video Conversion – Handbrake v0.9.9: link
Handbrake is a media conversion tool that was initially designed to help DVD ISOs and Video CDs into more common video formats. The principle today is still the same, primarily as an output for H.264 + AAC/MP3 audio within an MKV container. In our test we use the same videos as in the Xilisoft test, and results are given in frames per second.
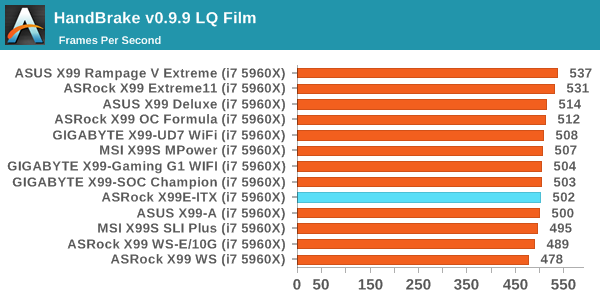
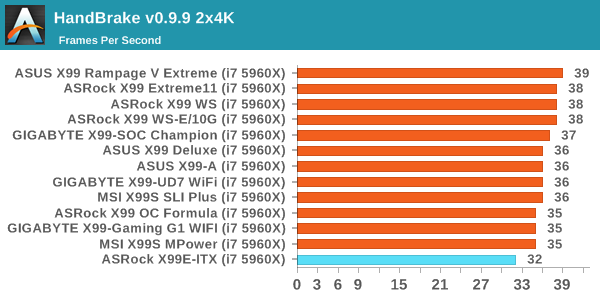
One would normally point at video conversion as requiring DRAM accesses, but we see a difference here between low quality conversion and high quality conversion. Using the larger frames we see that dual channel memory causes a ~10% drop in performance compared to other non-MCE enabled motherboards.
Rendering – PovRay 3.7: link
The Persistence of Vision RayTracer, or PovRay, is a freeware package for as the name suggests, ray tracing. It is a pure renderer, rather than modeling software, but the latest beta version contains a handy benchmark for stressing all processing threads on a platform. We have been using this test in motherboard reviews to test memory stability at various CPU speeds to good effect – if it passes the test, the IMC in the CPU is stable for a given CPU speed. As a CPU test, it runs for approximately 2-3 minutes on high end platforms.

No changes for POV-Ray in dual channel.
Synthetic – 7-Zip 9.2: link
As an open source compression tool, 7-Zip is a popular tool for making sets of files easier to handle and transfer. The software offers up its own benchmark, to which we report the result.
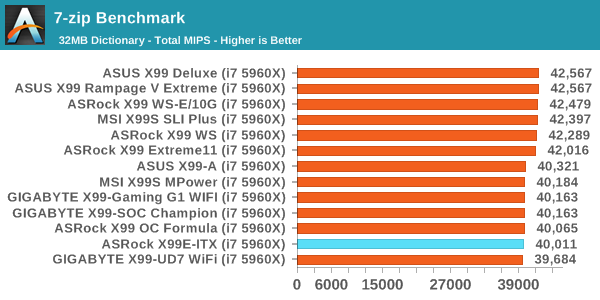
Similarly no difference in 7-zip.
Gaming Performance 2015
Our 2015 gaming results are still relatively new, and thus along with the motherboards tested we are also including some other CPU results for completeness.
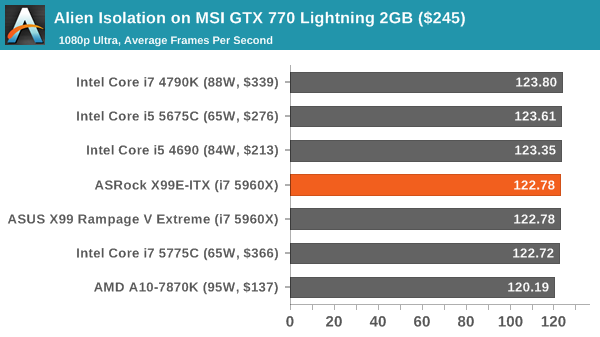
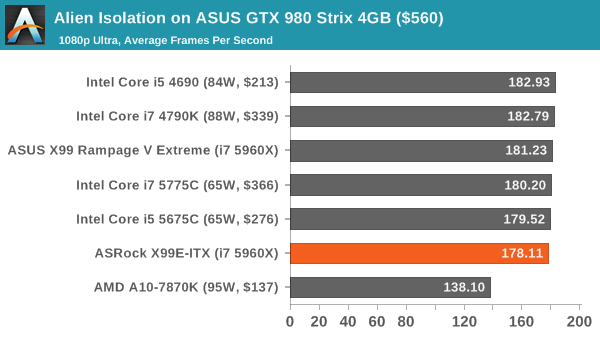
Alien: Isolation
If first person survival mixed with horror is your sort of thing, then Alien: Isolation, based off of the Alien franchise, should be an interesting title. Developed by The Creative Assembly and released in October 2014, Alien: Isolation has won numerous awards from Game Of The Year to several top 10s/25s and Best Horror titles, ratcheting up over a million sales by February 2015. Alien: Isolation uses a custom built engine which includes dynamic sound effects and should be fully multi-core enabled.
For low end graphics, we test at 720p with Ultra settings, whereas for mid and high range graphics we bump this up to 1080p, taking the average frame rate as our marker with a scripted version of the built-in benchmark.


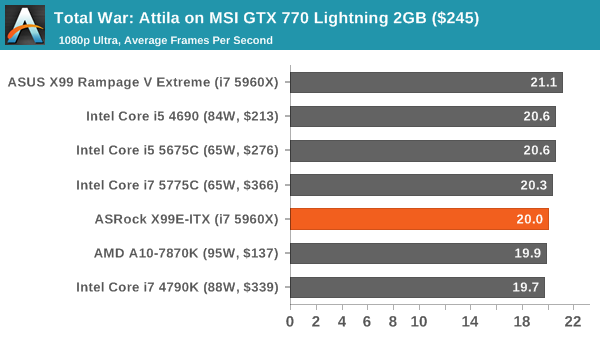
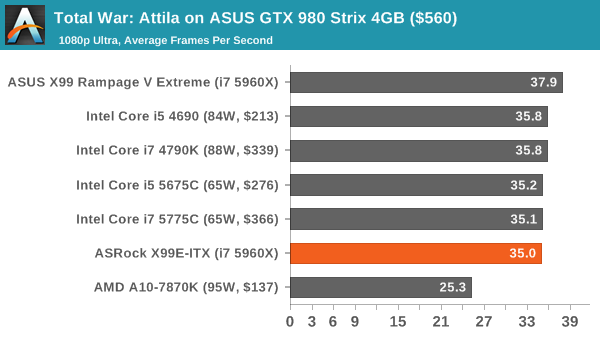
Total War: Attila
The Total War franchise moves on to Attila, another The Creative Assembly development, and is a stand-alone strategy title set in 395AD where the main story line lets the gamer take control of the leader of the Huns in order to conquer parts of the world. Graphically the game can render hundreds/thousands of units on screen at once, all with their individual actions and can put some of the big cards to task.
For low end graphics, we test at 720p with performance settings, recording the average frame rate. With mid and high range graphics, we test at 1080p with the quality setting. In both circumstances, unlimited video memory is enabled and the in-game scripted benchmark is used.


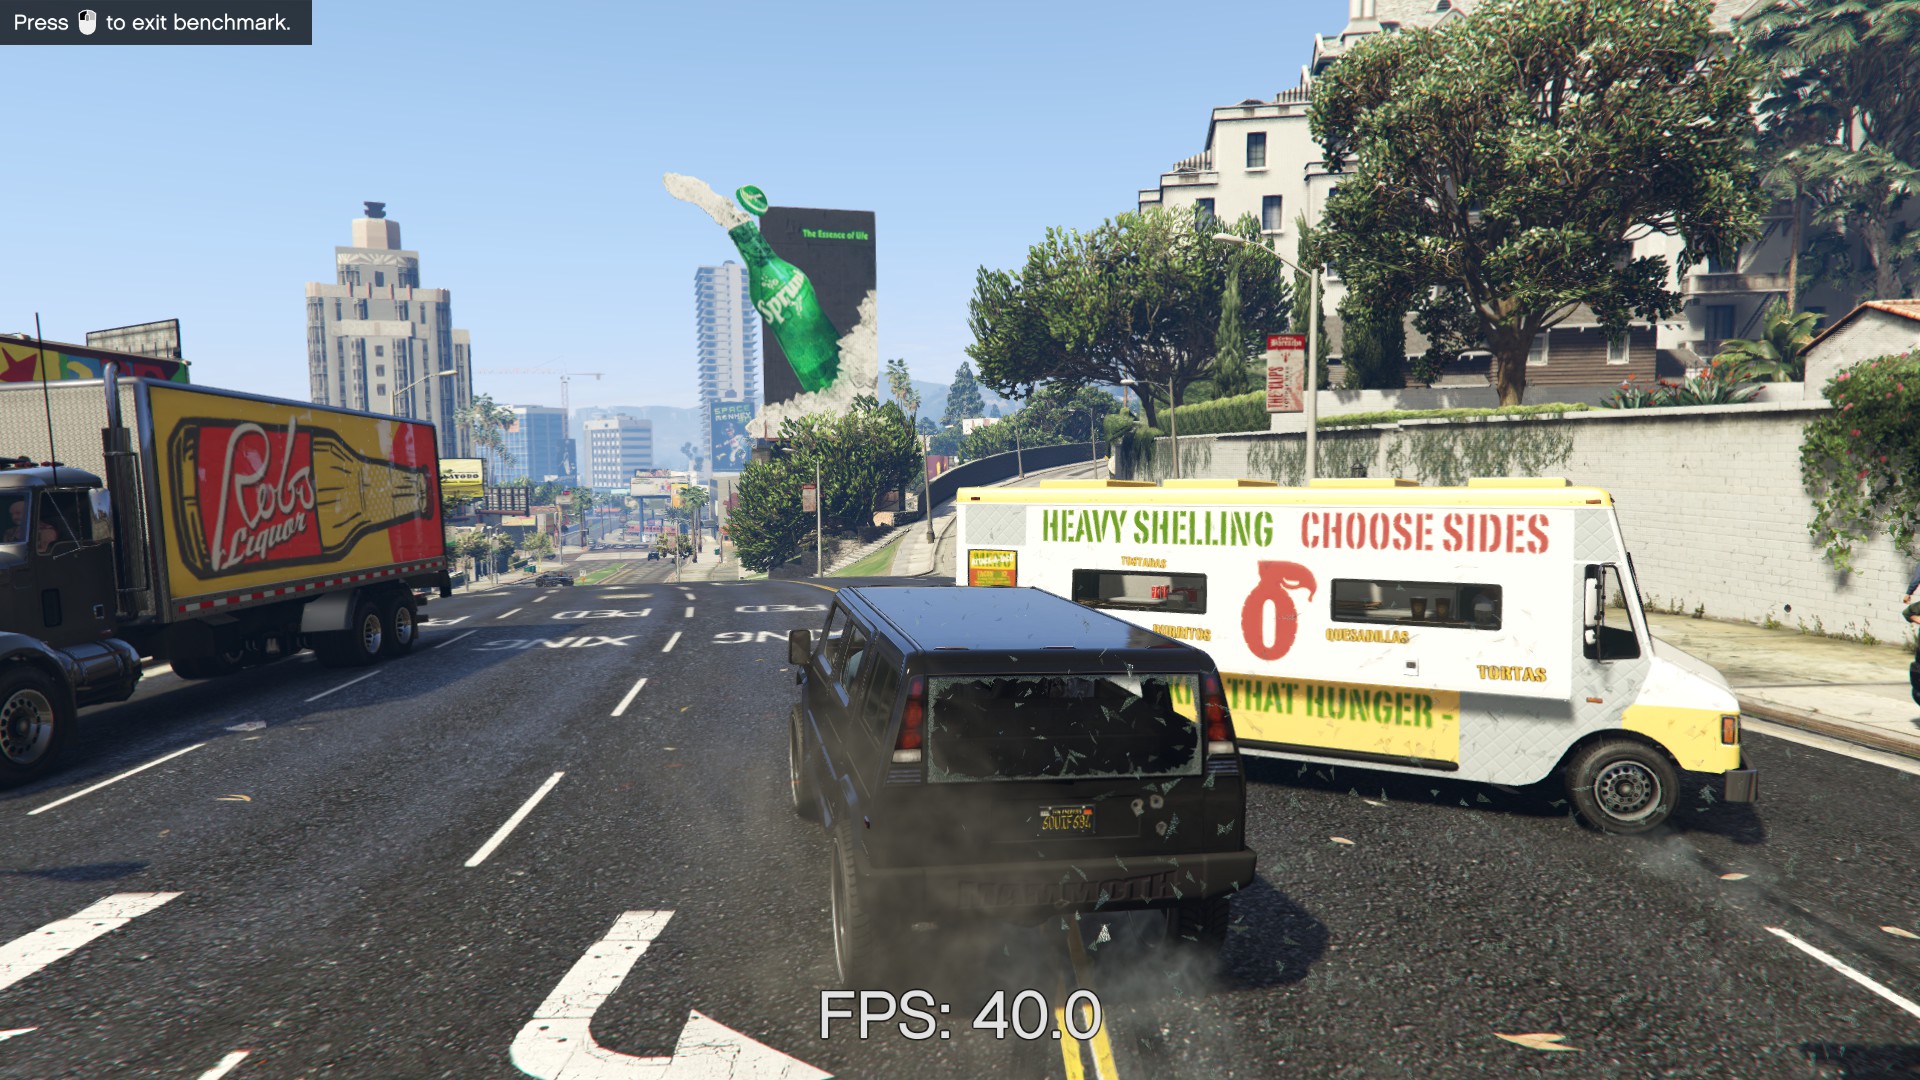
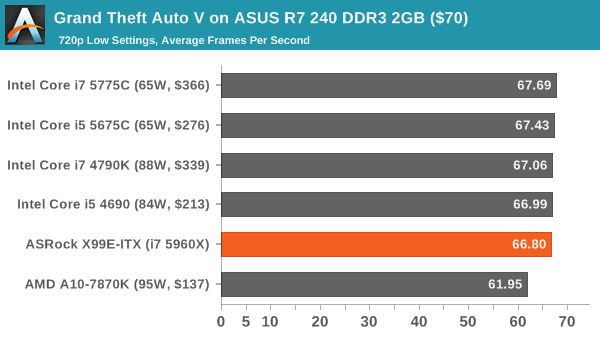
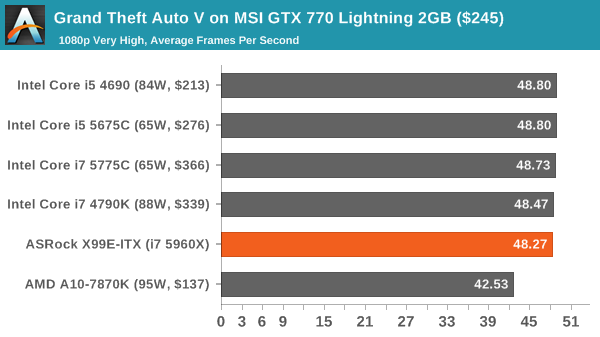
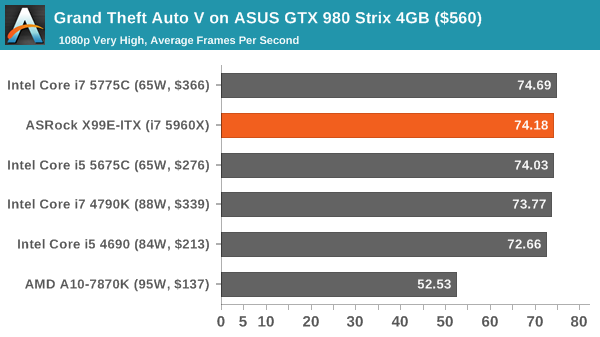
Grand Theft Auto V
The highly anticipated iteration of the Grand Theft Auto franchise finally hit the shelves on April 14th 2015, with both AMD and NVIDIA in tow to help optimize the title. GTA doesn’t provide graphical presets, but opens up the options to users and extends the boundaries by pushing even the hardest systems to the limit using Rockstar’s Advanced Game Engine. Whether the user is flying high in the mountains with long draw distances or dealing with assorted trash in the city, when cranked up to maximum it creates stunning visuals but hard work for both the CPU and the GPU.
For our test we have scripted a version of the in-game benchmark, relying only on the final part which combines a flight scene along with an in-city drive-by followed by a tanker explosion. For low end systems we test at 720p on the lowest settings, whereas mid and high end graphics play at 1080p with very high settings across the board. We record both the average frame rate and the percentage of frames under 60 FPS (16.6ms).
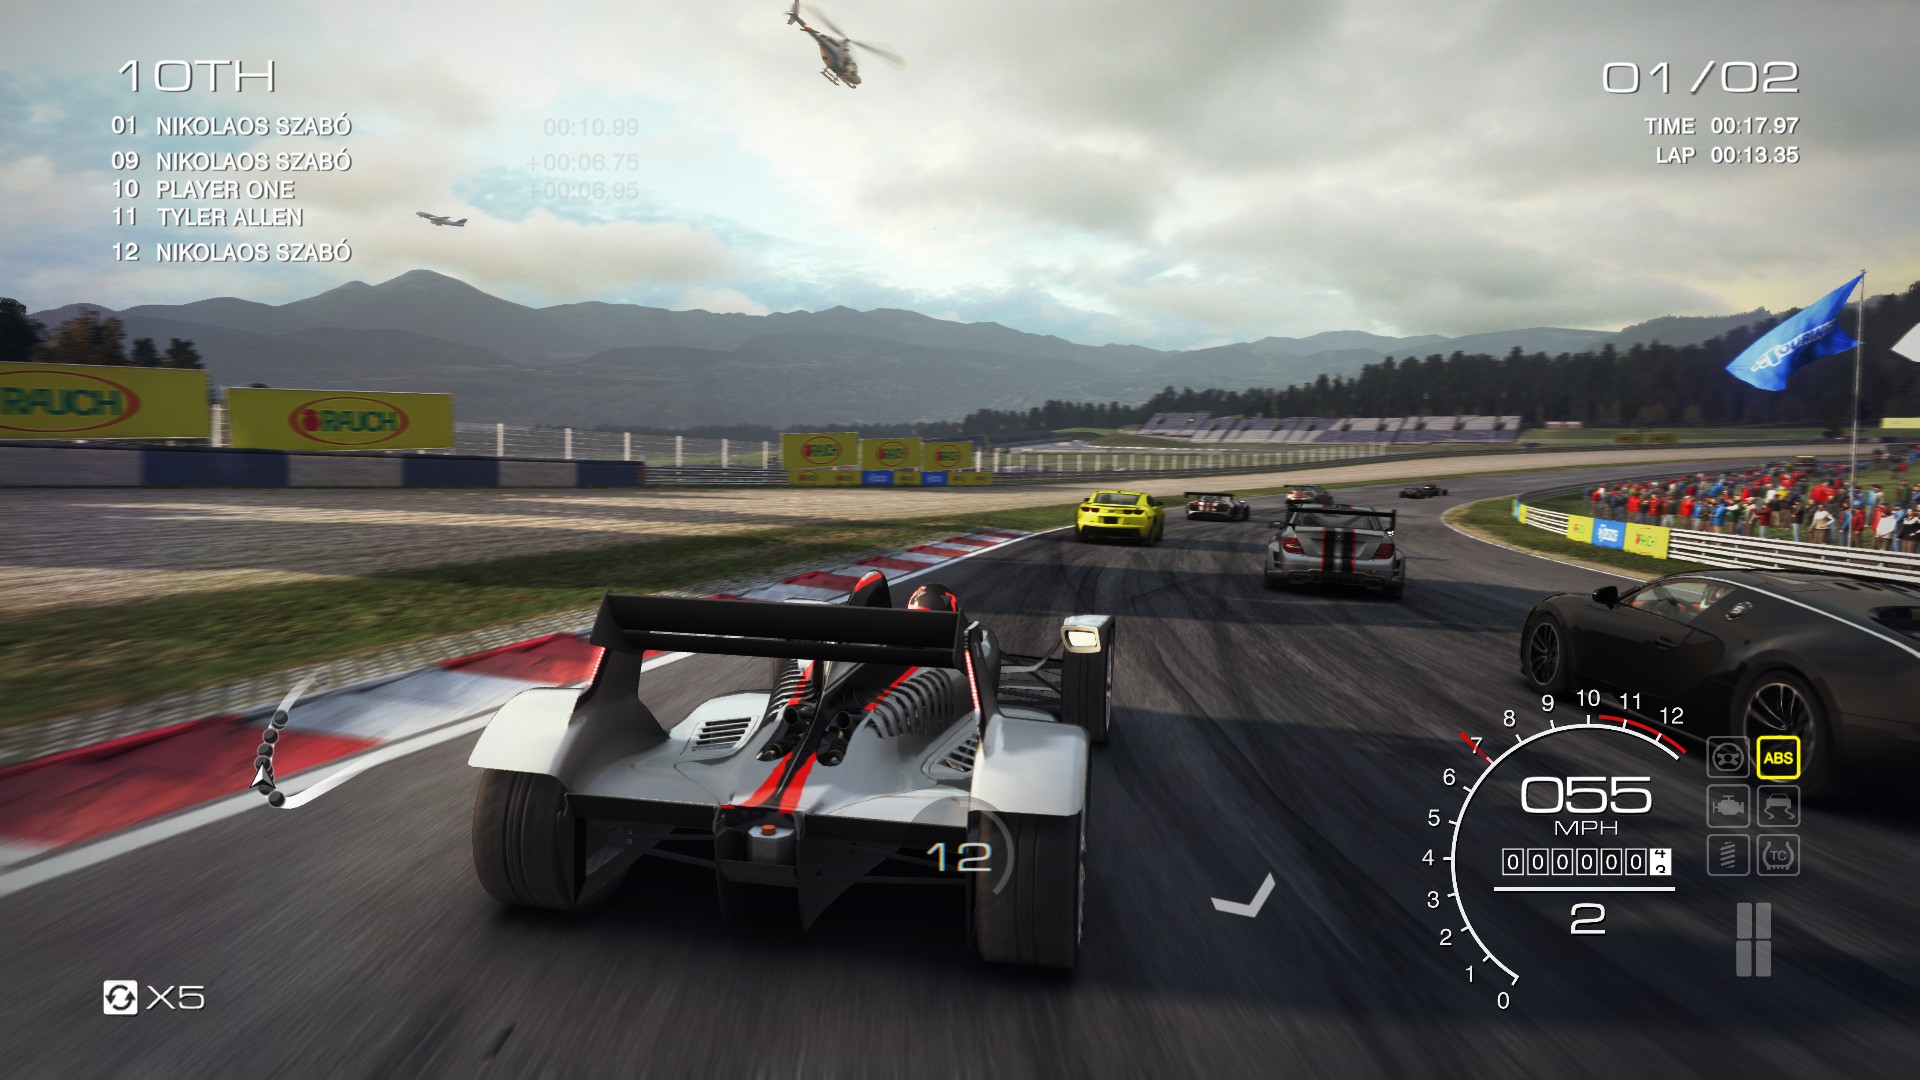
GRID: Autosport
No graphics tests are complete without some input from Codemasters and the EGO engine, which means for this round of testing we point towards GRID: Autosport, the next iteration in the GRID and racing genre. As with our previous racing testing, each update to the engine aims to add in effects, reflections, detail and realism, with Codemasters making ‘authenticity’ a main focal point for this version.
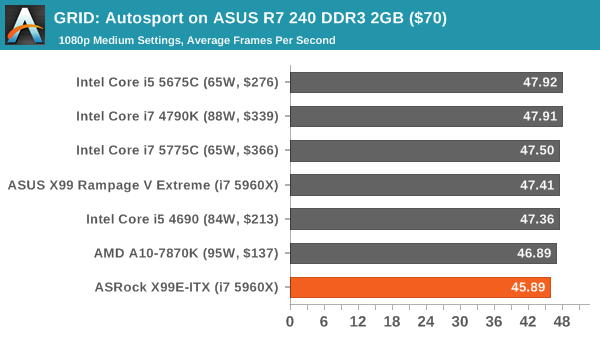
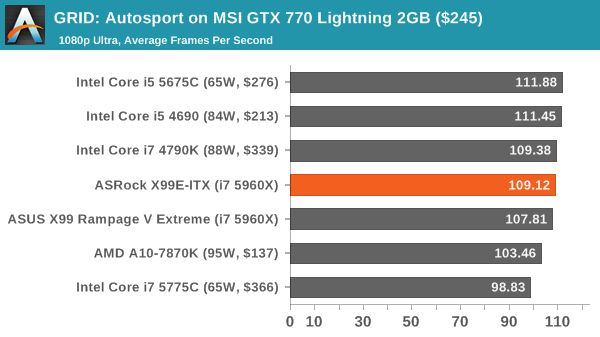
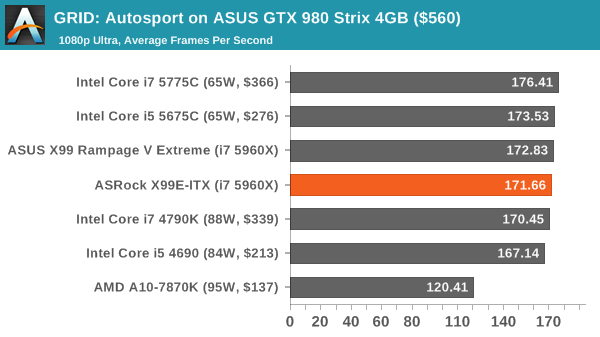
GRID’s benchmark mode is very flexible, and as a result we created a test race using a shortened version of the Red Bull Ring with twelve cars doing two laps. The car is focus starts last and is quite fast, but usually finishes second or third. For low end graphics we test at 1080p medium settings, whereas mid and high end graphics get the full 1080p maximum. Both the average and minimum frame rates are recorded.
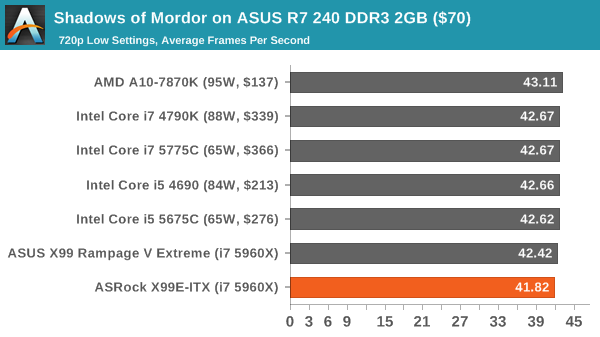
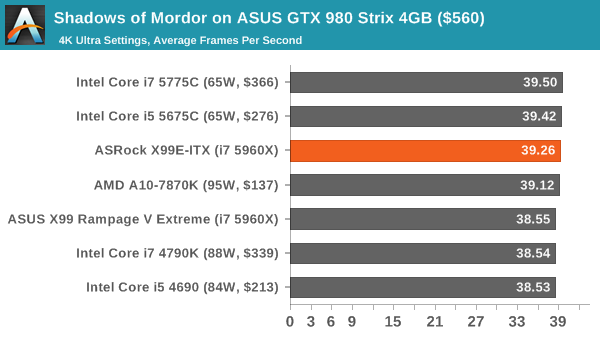
Middle-Earth: Shadows of Mordor
The final title in our testing is another battle of system performance with the open world action-adventure title, Shadows of Mordor. Produced by Monolith using the LithTech Jupiter EX engine and numerous detail add-ons, SoM goes for detail and complexity to a large extent, despite having to be cut down from the original plans. The main story itself was written by the same writer as Red Dead Redemption, and it received Zero Punctuation’s Game of The Year in 2014.
For testing purposes, SoM gives a dynamic screen resolution setting, allowing us to render at high resolutions that are then scaled down to the monitor. As a result, we get several tests using the in-game benchmark. For low end graphics we examine at 720p with low settings, whereas mid and high end graphics get 1080p Ultra. The top graphics test is also redone at 3840x2160, also with Ultra settings, and we also test two cards at 4K where possible.


ASRock X99E-ITX/ac Conclusion
When we first reported that the X99E-ITX was announced, we got a clear coarse reaction in the comment section. On one side of the equation were a group of users who were waiting for this sort of product to hit the market. Something small that could cater to SFF builds but still retains premium performance – a great video from Linus and Luke at LinusTechTips shows how this board can fit into something like a shoebox with an 18-core E5-2699 v3 CPU with off-the-shelf water cooling, 32GB of ECC memory, dual SSDs and an NVIDIA Titan X graphics card as well.
The other side of the crowd, and by far the biggest, expressed an element of WTF and dismissed the product as either a stunt or a waste of money based on the Haswell-E features that a user would not get by going with something this small, namely multi-GPU setups or quad-channel memory. At the time, users also stated that it was ‘a board just for Ian’, based on my own personal thoughts on the matter.

Perhaps it can be construed as true. I like engineering, and something that combats the performance/size curve is interesting even if it isn’t relevant. I have approached all the major motherboard manufacturers since the launch of X79, asking them all more than once about whether a mini-ITX board on the high-end platform was possible and if one would be made. All of them came back with comments similar to the second lot of users I describe above, stating that the drop in memory channels or the lack of multi-GPU use would cross such a product off of the list for potential X99 customers. Volumes would be considered too small compared to the engineering required, and many wrote it off in a similar fashion – even ASRock at first.
That being said, ASRock is a company that over the years has always dared to do something a little different to the competition. Motherboards such as the X79 Extreme11 with tons of SATA ports or the X99-E/WS 10G with built-in 10GBase-T Ethernet are two such examples. If I were to have put money on a manufacturer going for a high end mini-ITX platform it would have been them. Seems like I could have made $50 on that bet.
Even though part of me wants to think I’m responsible for requesting this, ASRock has stated that I wasn’t the only person asking. Even then, based on the ‘finally!’ moment I had when it came to market, I thought twice about even reviewing it, in case any bias crept into the review. In that regard, I want the results to do the talking.
The base line arguments when we started were surrounding a lack of multi-GPU and dual channel memory limiting the bandwidth total capacity. The first one cannot be helped in such a small form factor, but we can address the second.
Our results show that memory bandwidth, moving from quad channel to dual channel, does not cut benchmark results in half. Almost all our benchmarks are still CPU bound, and almost all regular workloads are too. For enthusiast users working on specific software packages, there may be fringe results that see a loss, but on the whole, even in gaming, we saw little to no difference. Transcoding large frames saw a small 10% deficit, and something smaller in WinRAR, but that’s about it.
For capacity, at the time the X99E-ITX was announced, there were no 16GB UDIMM modules on the market – we were wholly thinking along 8GB DIMMs, meaning 16GB total. That changes with 16GB UDIMMs, as it now allows 32GB total. That being said, dual channel kits of 16GB modules are not in the market yet, and we might have to wait for future platforms to come to market before that happens.
Motherboard performance for USB, audio, DPC Latency and POST times are all within the regular X99 window and we do not see any detriment in that regard. As this is the first USB 3.1 motherboard we have tested, it comes top of that chart unsurprisingly.
I mentioned at the start of this review that the other motherboard manufacturers will be looking at the ASRock X99E-ITX to see whether the small form factor ITX market is bigger or smaller than their internal numbers suggest. At this point in time, it becomes a recommended motherboard by virtue of it being the only X99 mITX motherboard on the market, and is currently available for $250 ($300 MSRP). To supplement some of the initial backlash, ASRock has at least designed it well with some high-end features and it seems to be getting a lot of exposure. The results show that dual channel memory is not a problem in many situations, and the inclusion of a narrow-ILM CPU cooler and magnetic CLC bracket gets around the socket issues.
Based on feedback, there will always be detractors for this type of product. For everyone wanting a small-form-factor machine on the high-end platform, there is only one choice.


